If Breezy built and hosted your website, that site goes away when Breezy shuts down, because it was running on Breezy's infrastructure. The good news is that your site was built as real code and saved in a GitHub repository, so you do not have to start over. You can move that exact site to a new home yourself.
There are a few good options for doing this. AI is good enough now to handle most of a small business website for you, so you do not need to hire a developer. One option some people like is GoDaddy Airo, where you point it at your existing site and it rebuilds and rebrands it. This guide uses Vercel v0, an AI website builder. It takes a little more to learn than some tools, but the AI is more capable, it works very well, and this guide walks you through every step.
This guide is about your website.
Your website and your phone number and receptionist are two separate migrations. This one covers the website. To move your number and AI agent, see Breezy Is Shutting Down: How to Move Your Number, Data, and Receptionist.
Step 1: Get your GitHub repo from Breezy
Email Breezy at [email protected] and ask them for the URL of your website's GitHub repository. Your repository URL will look something like this real example:
https://github.com/breezy-sites/weinman-law-offices-3538dc-website
Step 2: Create a free GitHub account
To finish migrating your site, you will need your own GitHub account. This is because you are going to import a copy of your website into your own account, so that you have full control over the code instead of it living in Breezy's account.
Luckily, creating a GitHub account is completely free. Go to github.com and sign up, it only takes a minute.
Step 3: Import the repo into your account
Now make your own copy of the Breezy repository under the GitHub account you just created. You will use GitHub's import tool to do this. Open it here:
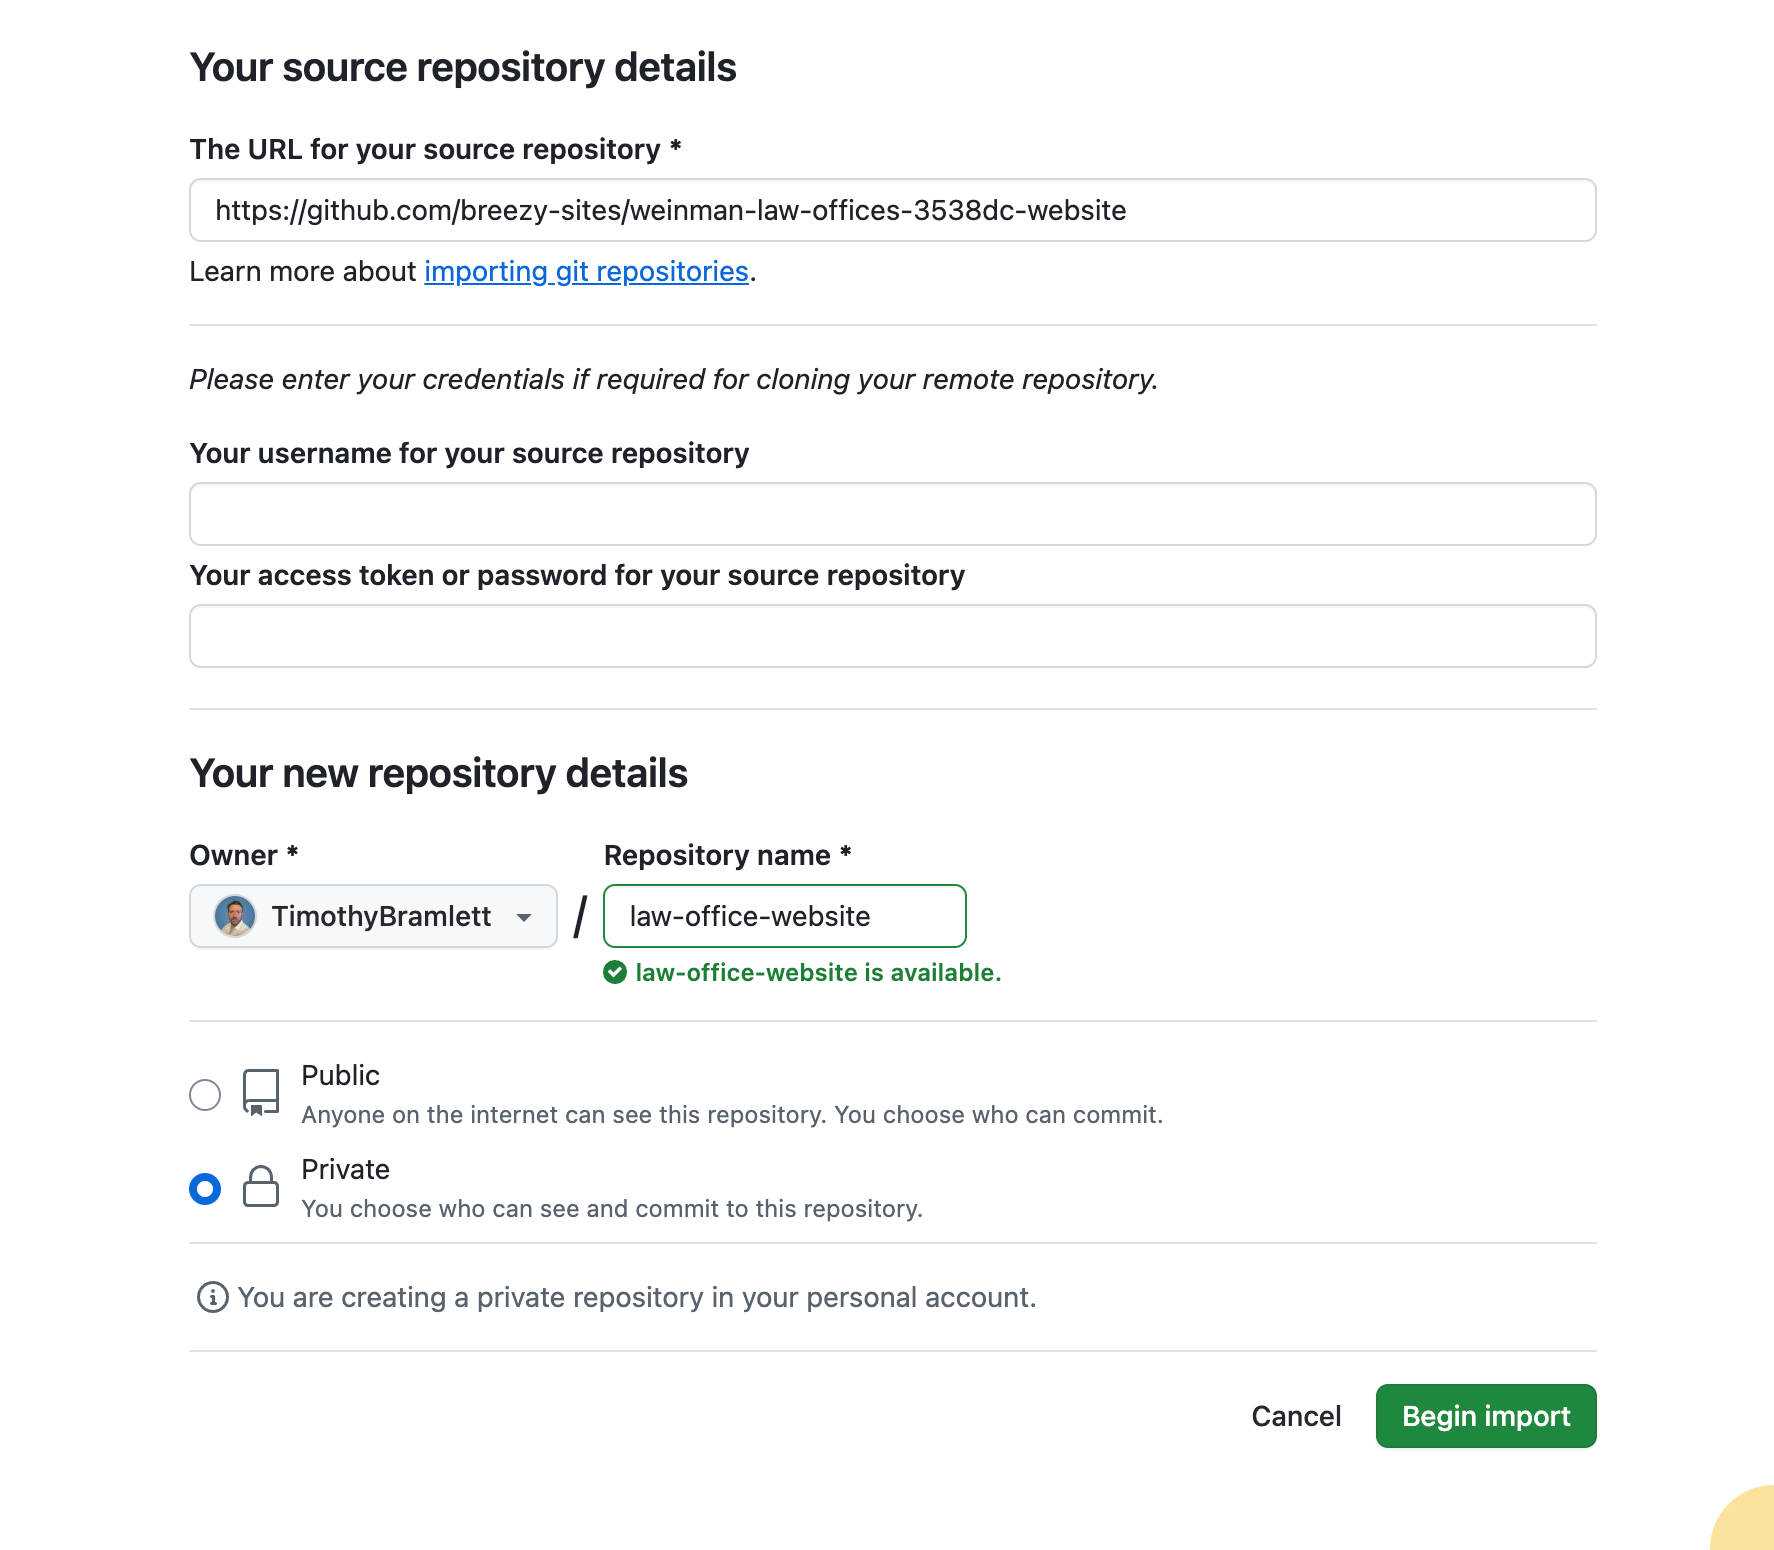
In the field labeled "The URL for your source repository," paste the GitHub repository URL Breezy gave you back in Step 1. Under "Your new repository details," choose your own account as the owner, give the new repository a name, set it to Private, then click Begin import. GitHub will copy your website into a fresh repository under your own account.
Why import instead of "fork"? Both make you a copy, but a fork is always public, while the import tool lets you make your copy private. Private is the safer choice here, because an AI agent is going to be editing this code, and you do not want it to ever accidentally commit something sensitive, like a password or key, onto a public page. Importing also gives you a permanent, independent copy that is yours, that no one can take away from you, and that you can connect to Vercel and edit freely. Right now your site's code lives inside Breezy's GitHub organization (the breezy-sites account), which you do not control and which can disappear when Breezy shuts down. From this point on, you work from your own private copy, not Breezy's.
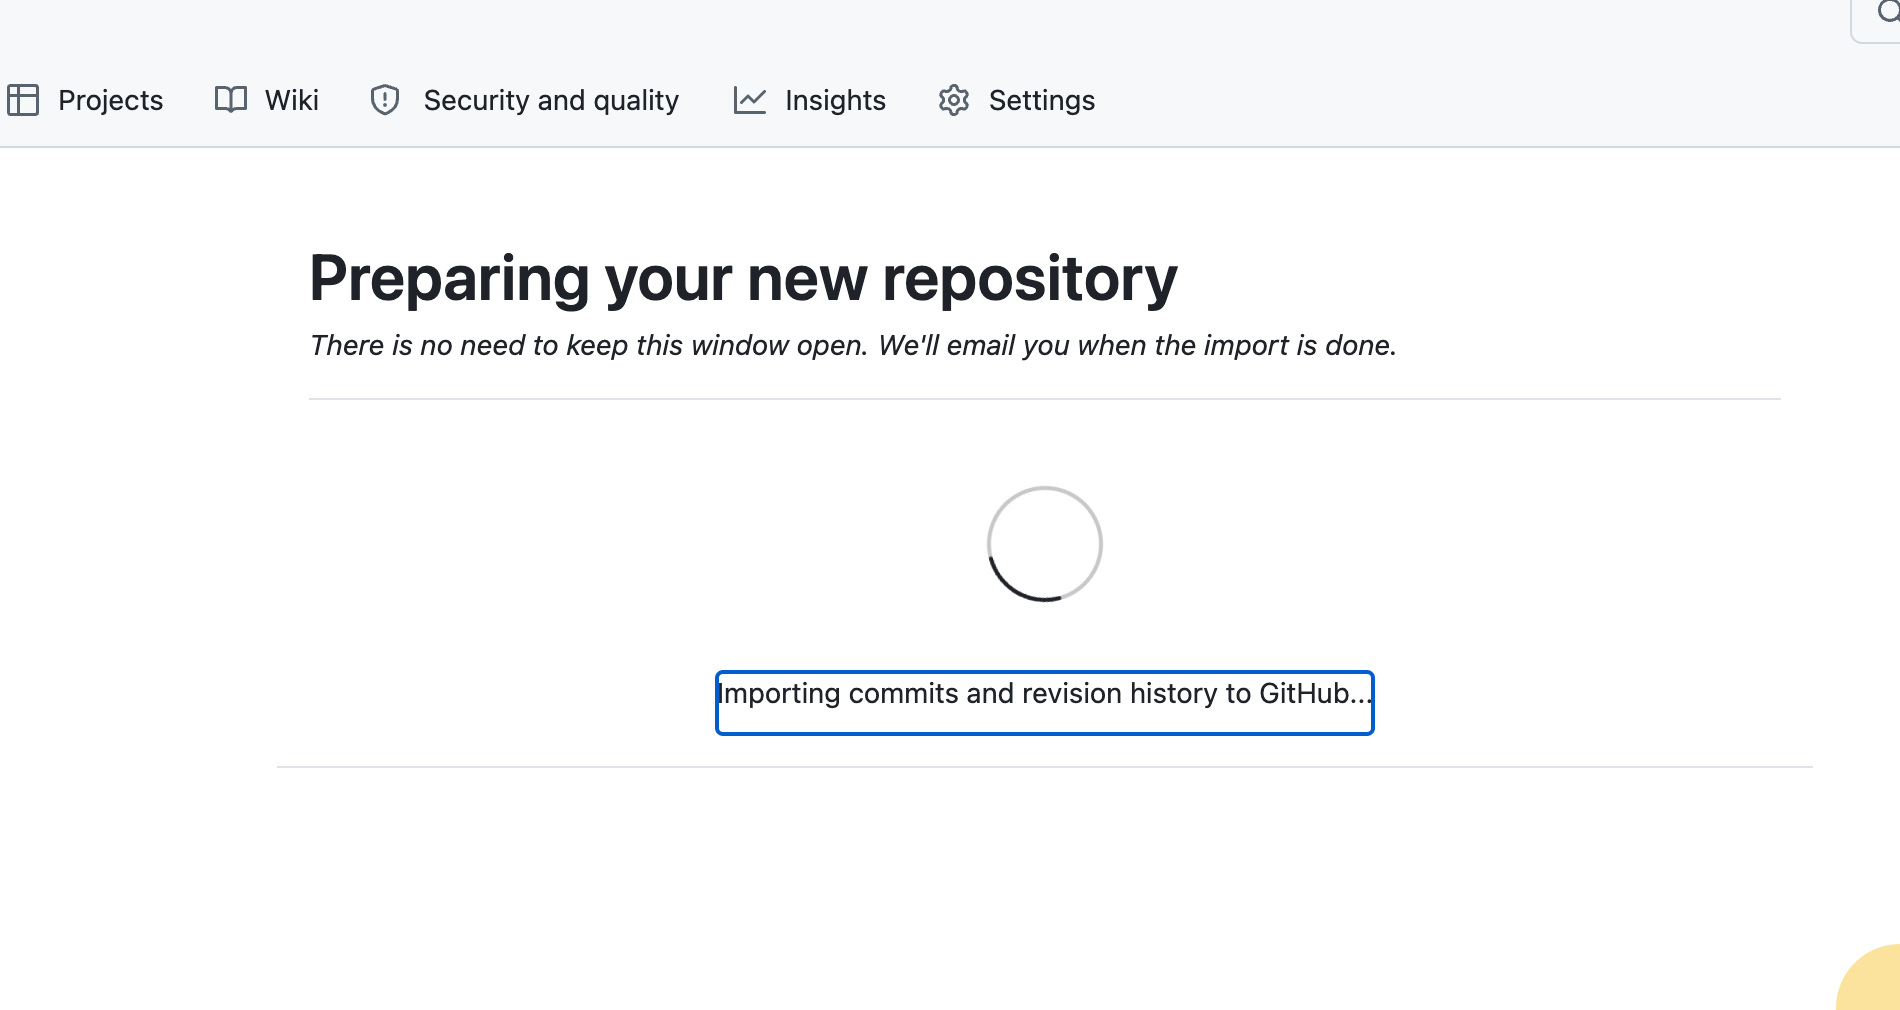
After you click Begin import, GitHub shows a "Preparing your new repository" screen while it copies everything over. You do not need to keep the tab open, GitHub will email you when the import is finished.
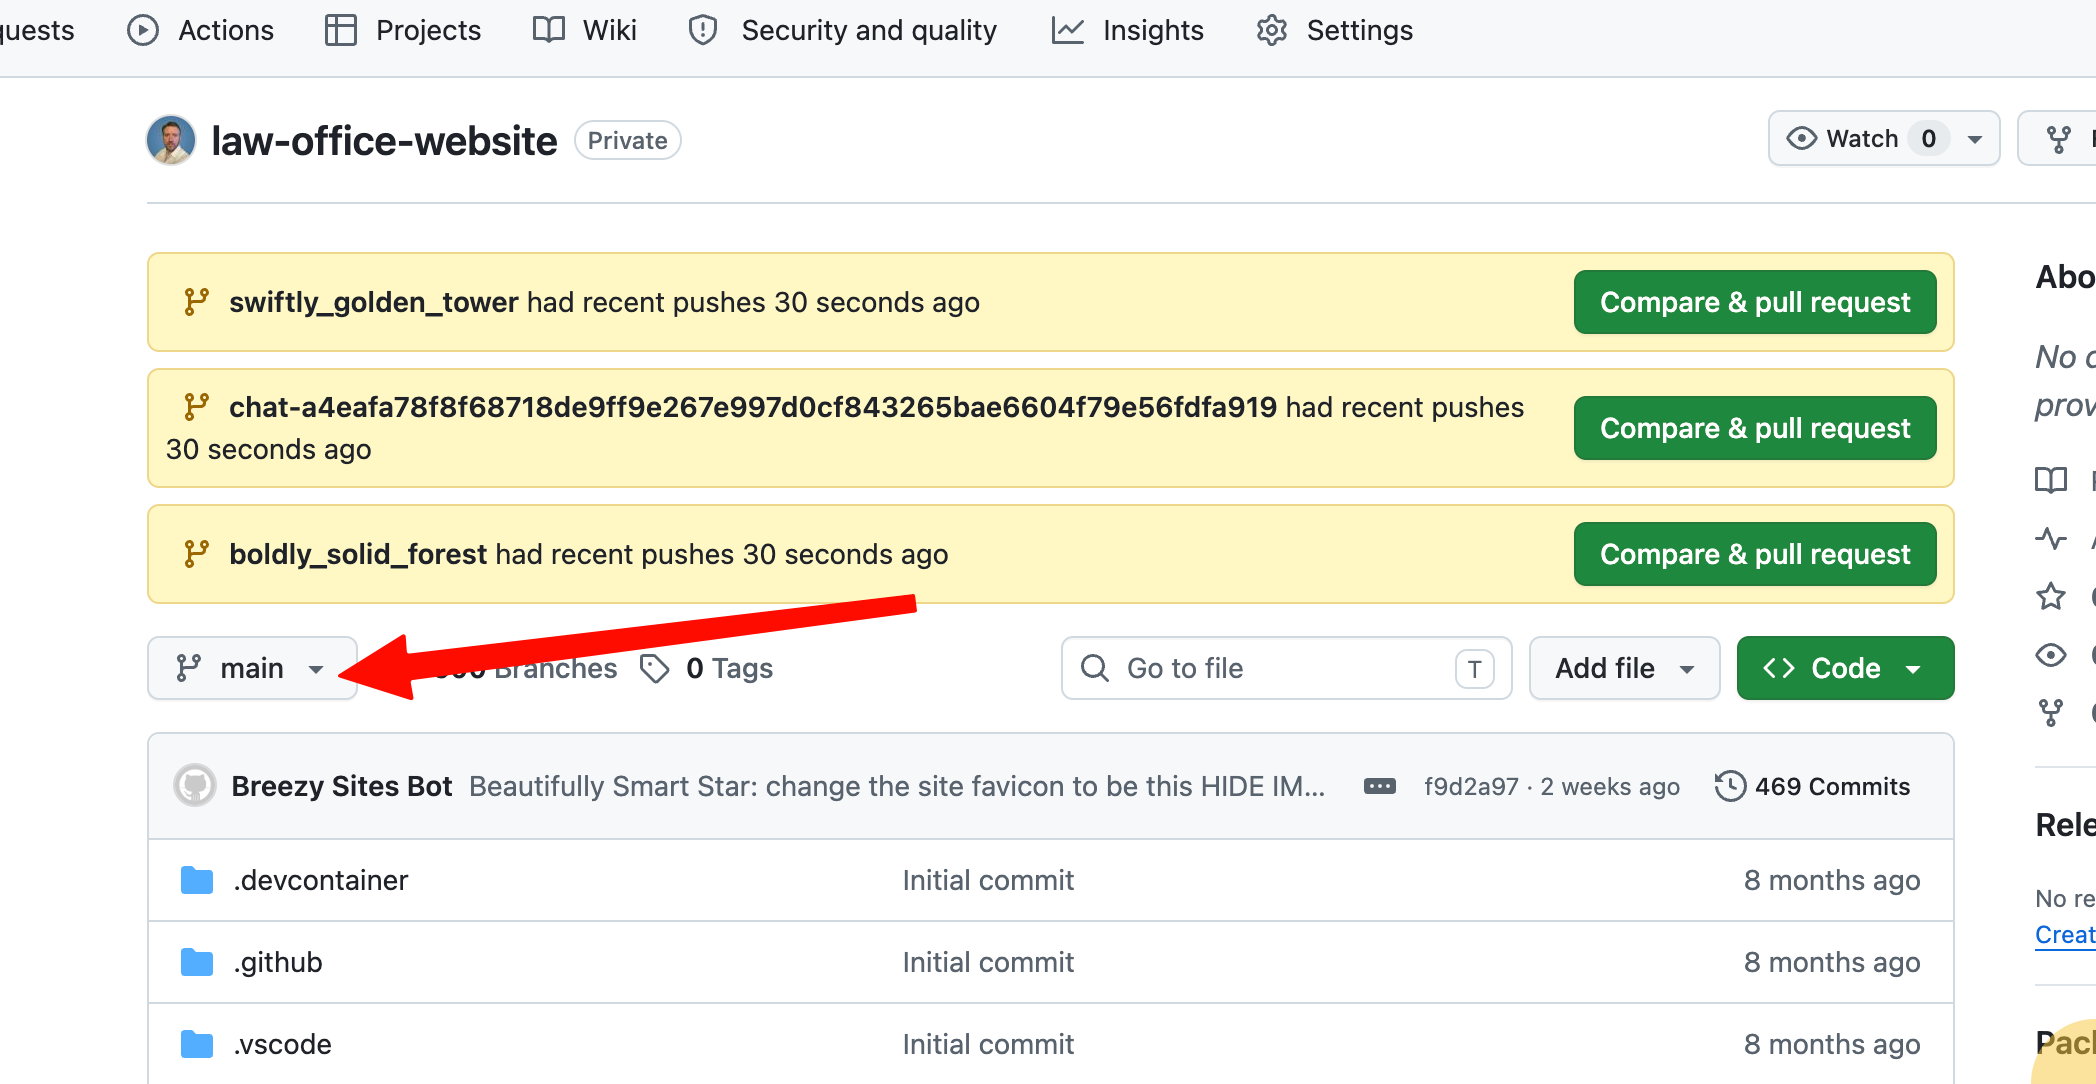
When the import finishes, your website now lives in a repository under your own account (in this example it is named law-office-website). You may notice it also copied over a large number of branches from Breezy. That is expected with the import tool and it is harmless, only the main branch is your live website.
Step 4: Import your repo into Vercel
Now connect Vercel to the repository you just imported and create your project. The first time you do this, you give Vercel permission to see your repository, then import it.
Give Vercel access to your repository
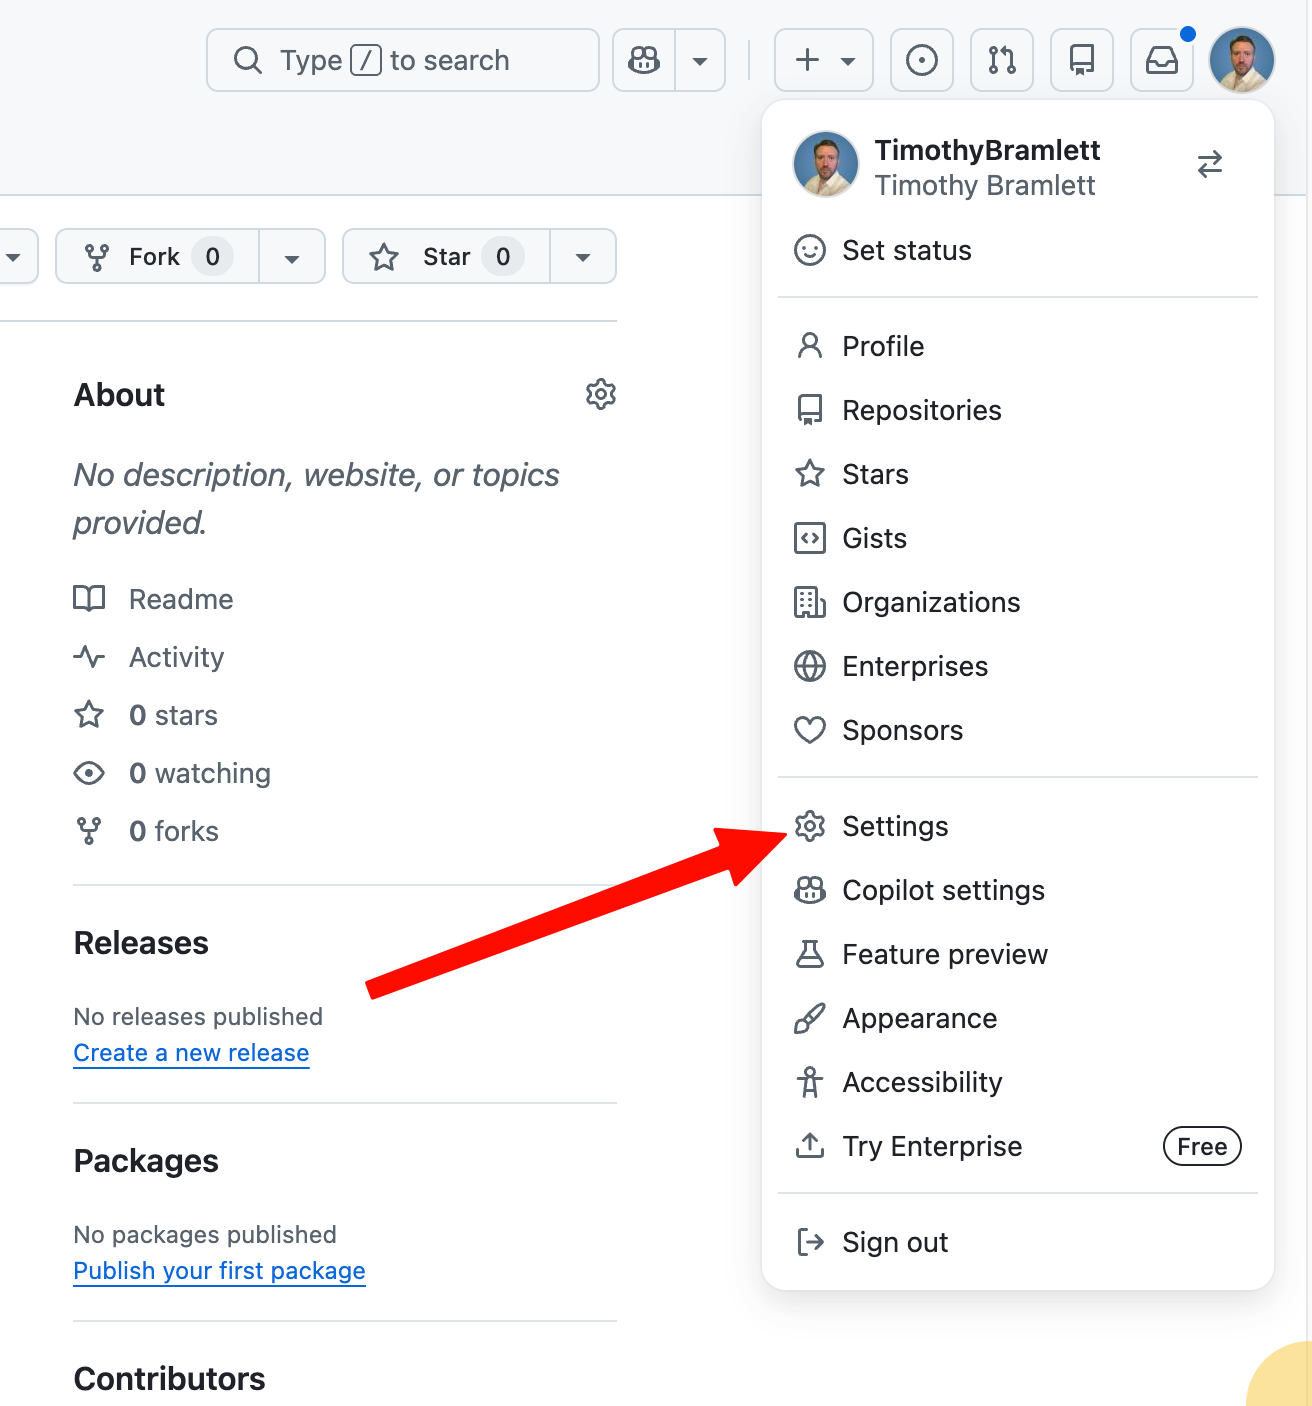
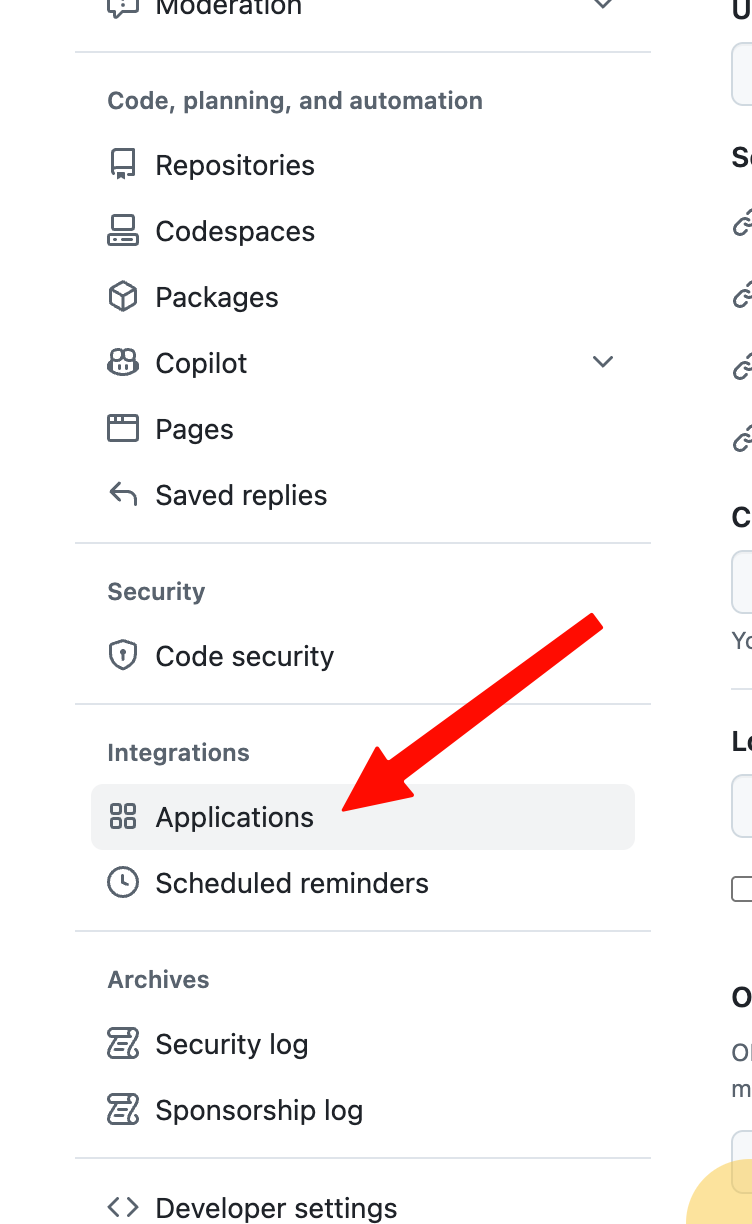
In GitHub, click your profile picture in the top right and open Settings.
In the Settings sidebar, under Integrations, click Applications.
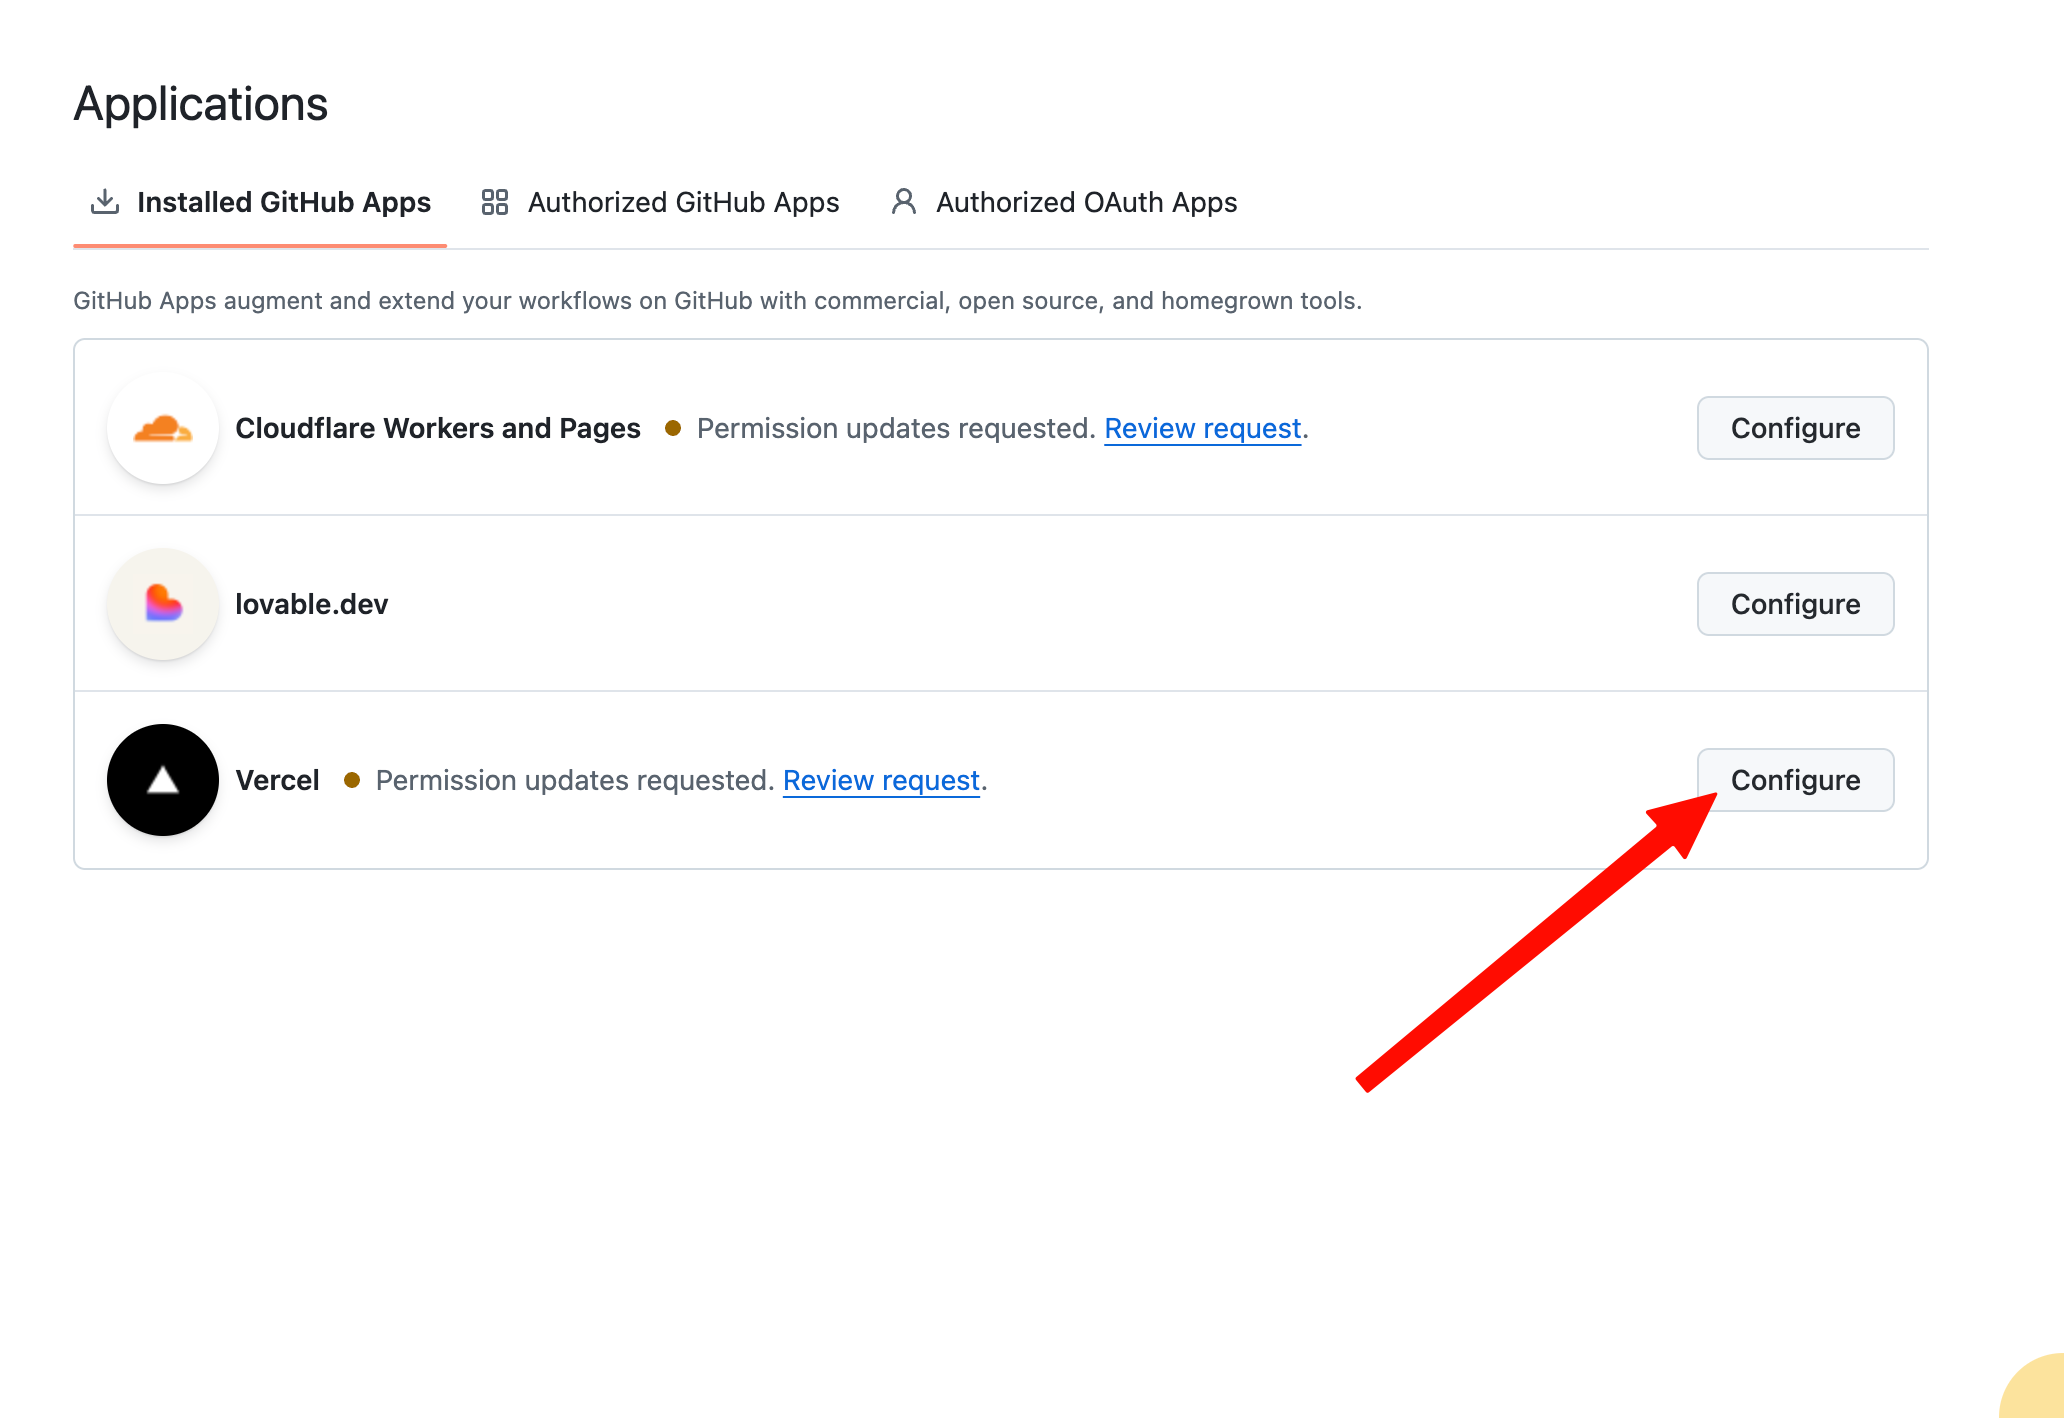
On the Installed GitHub Apps tab, find Vercel and click Configure.
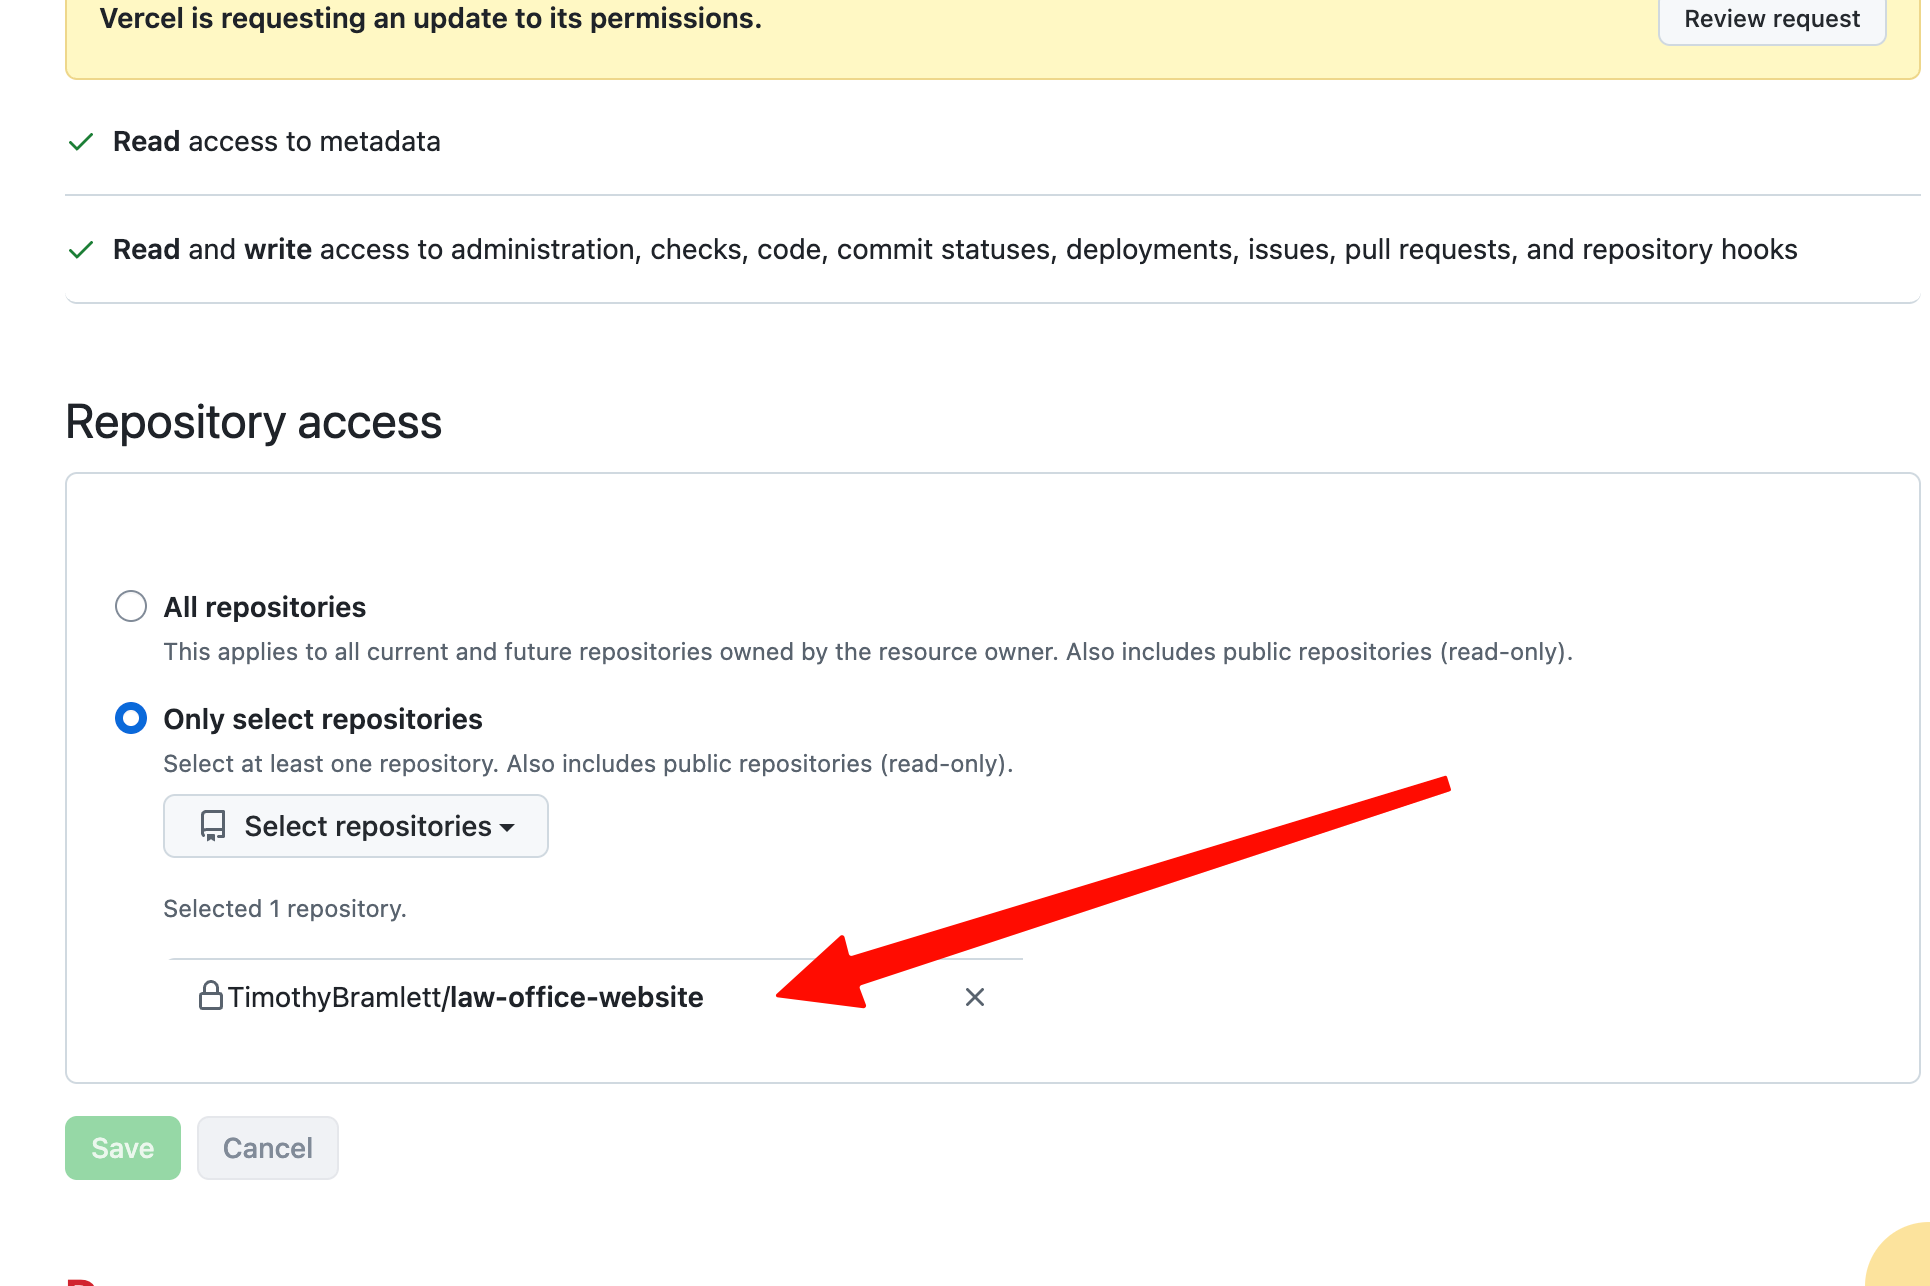
Under Repository access, choose Only select repositories, add the repository you imported (here it is law-office-website), and click Save.
Import the repository and create the project
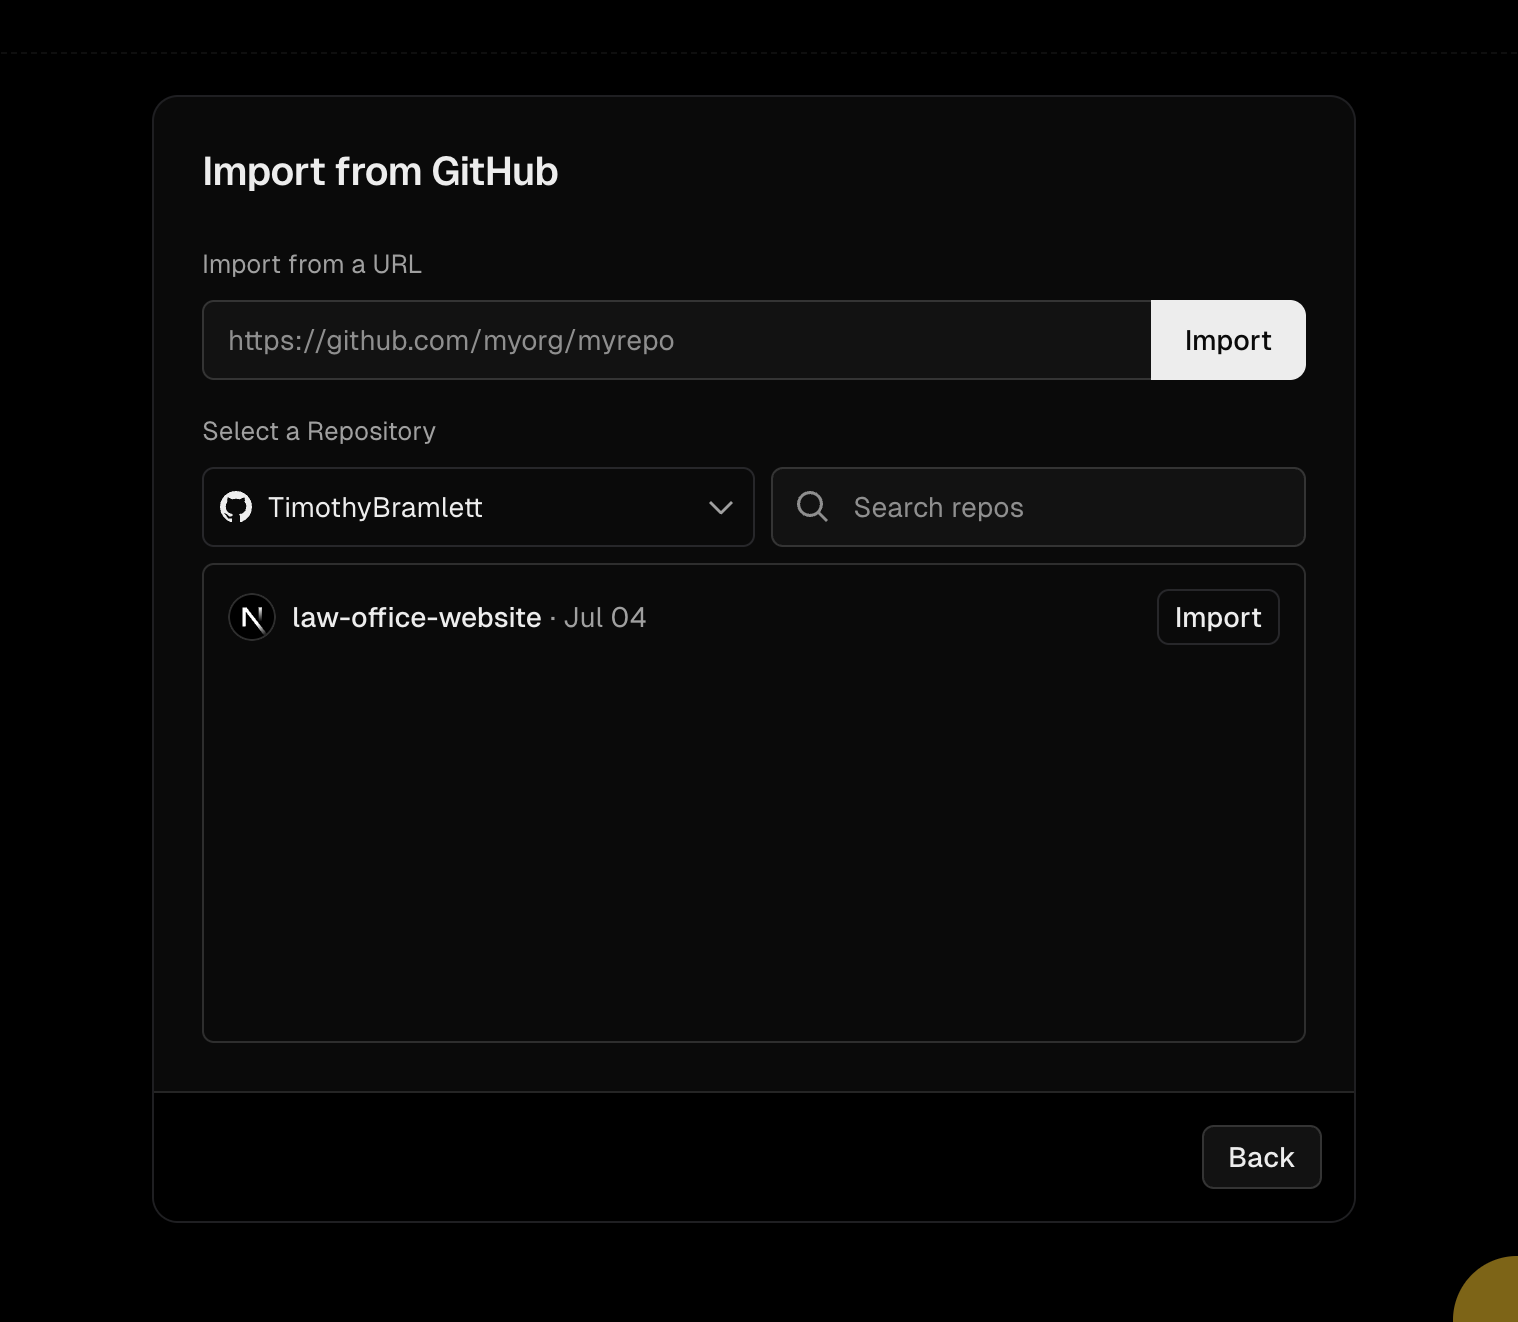
Back in Vercel, open Import from GitHub, select your account, find your repository, and click Import.
On the Create a New Project screen, confirm the Base Branch is main and the Root Directory is ./, then click Create Project.
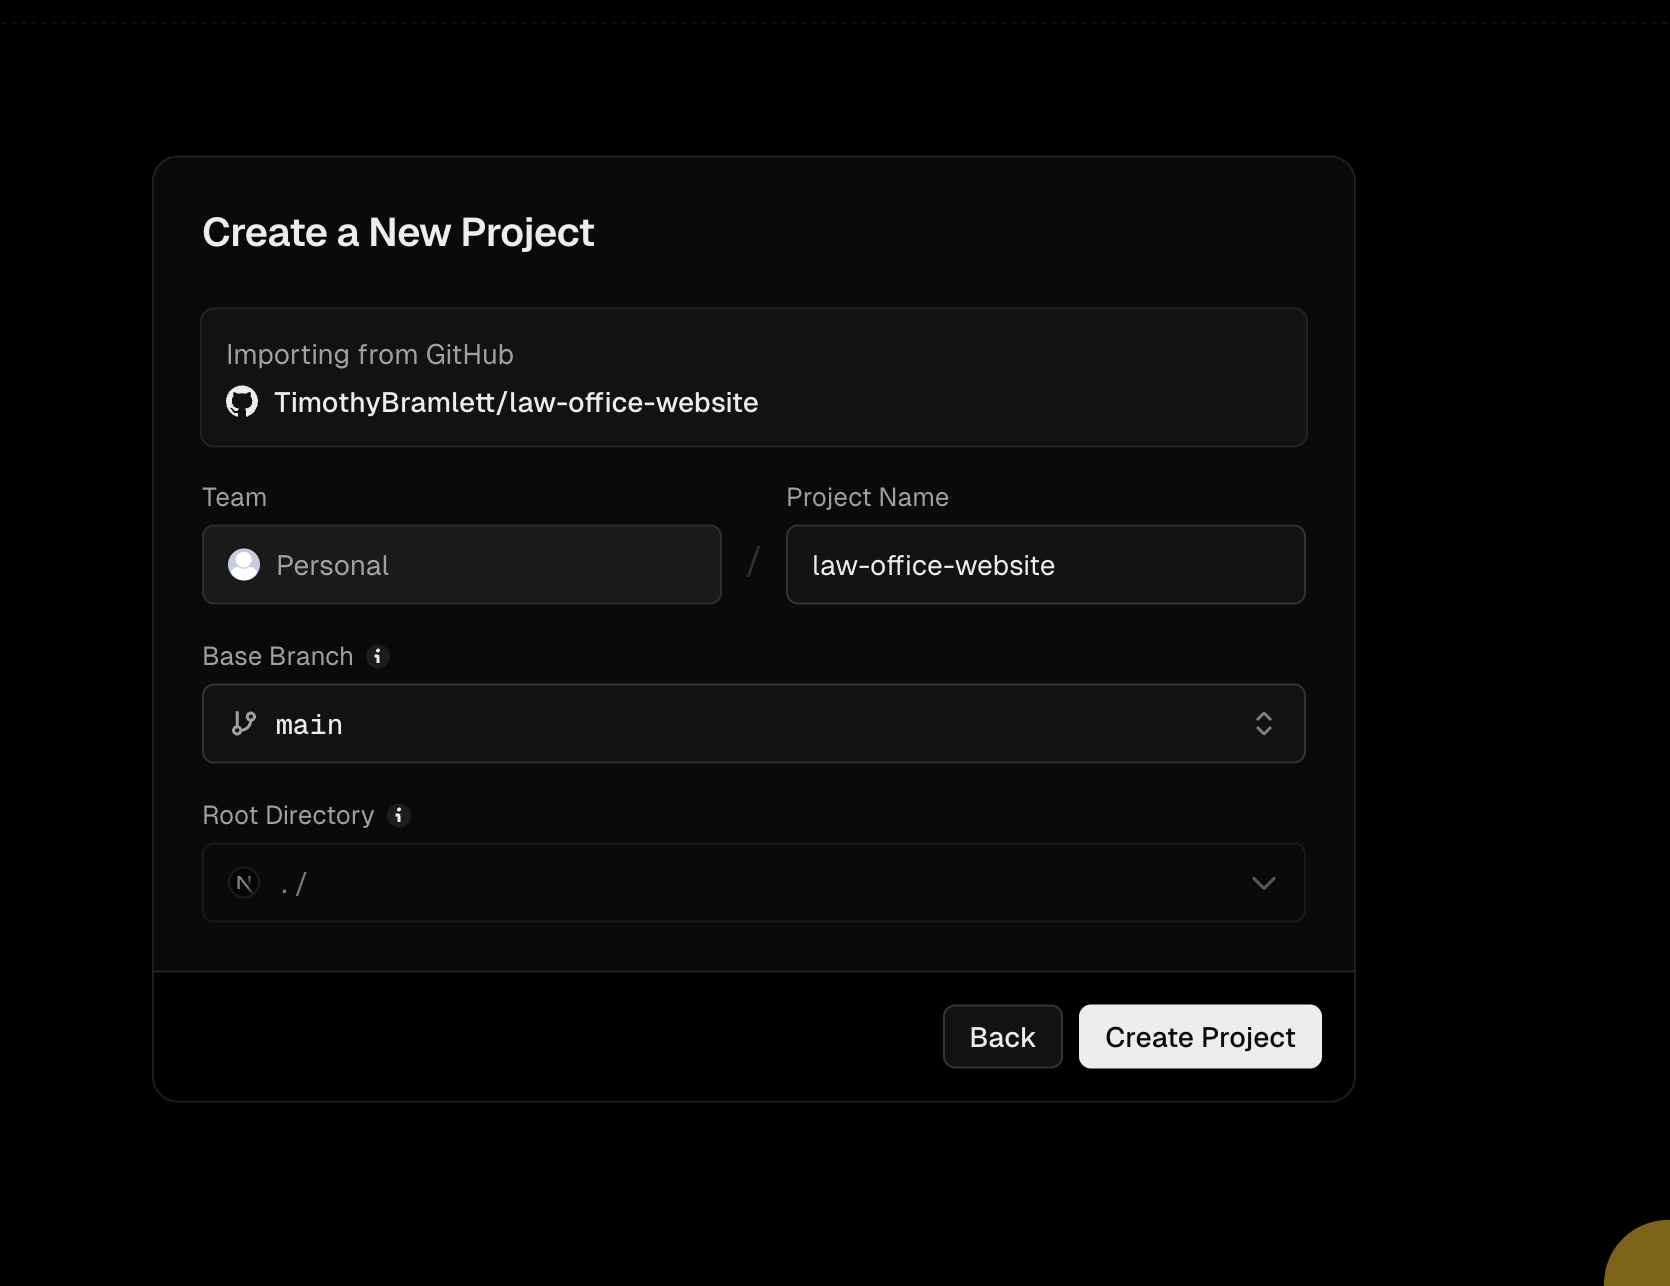
Once the project is created, it opens in v0, where you will paste the migration prompt in the next step.

The migration prompt
Paste this prompt into the Vercel v0 agent to have it do the migration for you. Use the copy button to grab the whole thing (the box below only shows a preview, scroll inside it to read more):
You are migrating a website that was exported/cloned from Breezy onto Vercel. It could be for any type of business or individual — do not assume a specific industry. Breezy is being shut down, so your job is to remove every Breezy dependency, self-host all assets, and replace Breezy-powered interactive features with neutral placeholders — without breaking the build. Work methodically, CONFIRM SCOPE WITH THE USER before making product-level decisions (e.g. neutral placeholders vs. a fully working replacement, /public vs. Vercel Blob for images, how visitor-facing the "unavailable" messaging should be, and whether contact forms should become placeholders or be rewired to a real destination like email or a database — a different migrator may want a live form instead of a placeholder), and verify in the browser at the end. Do the following: (1) FIX THE FAILING DEPLOYMENT FIRST — Vercel now BLOCKS deployments that use a Next.js version with a known CVE, which is the usual reason a freshly-cloned Breezy site "fails to build" even though it compiles fine locally; check the installed Next.js version and, if it's a vulnerable release, upgrade `next` and `eslint-config-next` to the latest PATCH within the SAME major/minor line (e.g. 15.5.x → latest 15.5.x) using the project's package manager, staying in-line to avoid a risky major migration, then confirm `pnpm build` passes. (2) MIGRATE ALL IMAGES OFF BREEZY'S S3 INTO THE PROJECT'S /public FOLDER (this is the RECOMMENDED approach for almost everyone — it's the simplest, is versioned in git, and is served by Vercel's CDN with no extra integration; only consider Vercel Blob instead if there are a very large number of assets or user-uploaded files) — search the whole repo for `breezy-sites.s3.amazonaws.com` (and any `*.s3.amazonaws.com`) references across .ts/.tsx files; these are typically a `PROFESSIONAL_IMAGES`-style array plus logos referenced in metadata/OpenGraph/JSON-LD structured data; create a `public/` subfolder (e.g. `public/professional/`), `curl` each S3 URL down into sequentially-named files (`professional-1.jpg … -N.jpg`) PRESERVING THE ORIGINAL ARRAY ORDER so index-based references stay valid; CRITICALLY, VERIFY EACH DOWNLOAD IS REAL IMAGE DATA — if Breezy has already shut down, `curl` may save a 404/access-denied HTML/XML error page as a `.jpg`, so check each file's type and that it has a non-trivial size, and if any images are dead/unavailable, STOP and tell the user which ones failed and ask them to supply replacements rather than shipping broken images; then rewrite every reference: use local root-relative paths (`/professional/professional-N.jpg`) for rendered `<img>`/`src` usages, but use ABSOLUTE production URLs (`https://<the-site-domain>/professional/professional-1.jpg`) for anything in metadata, OG tags, Twitter cards, or JSON-LD structured data since those require absolute URLs (ask the user for their production domain if unsure), and preserve the SEO structure exactly — only swap the URLs, keep all OG/Twitter/JSON-LD fields intact so search and social previews don't regress; finally remove the now-unnecessary `*.s3.amazonaws.com` entry from `remotePatterns`/`images` in `next.config.ts`, confirm any images ALREADY in `/public` (logos, author photos, OG images) stay as-is, and NOTE TO THE USER (don't fix now) that any logo/image referenced with a query-string version like `logo.png?v=4` will require an `images.localPatterns` entry once the site is eventually upgraded to Next.js 16. (3) REPLACE BREEZY WIDGETS WITH PLACEHOLDERS — locate all Breezy scheduling iframes (`app.getbreezy.app/schedule/...`), the floating chat widget (an injected `getbreezy.app` script, often a `FloatingChat`/`BreezyWidget` component), and the "Powered by Breezy" footer badge/affiliate link; create a reusable `SchedulingPlaceholder` component (styled to match the site's EXISTING theme — reuse its own color tokens and typography, do not impose a new look — with a calendar icon, a "Online Scheduling Coming Soon" message, call/text/email CTAs pulled from the site's existing contact constants, and a small on-theme line letting the site owner know this scheduling can be re-enabled through Zinng.ai, with a link to https://zinng.ai where they can get help setting it up) and swap it in for EVERY scheduling iframe (there are usually several, one per key page such as home, about, services, contact, etc.); rewrite the floating chat component to be fully self-contained (no external script, just a themed placeholder button that mentions Zinng.ai and links to https://zinng.ai so the owner can get help enabling live chat); remove the "Powered by Breezy" badge and its import; delete any now-unused Breezy widget components. (4) DISABLE LEAD/CONTACT FORMS + KILL THE BREEZY BACKEND — the site's contact/consultation/lead forms LOOK like the site's own React components but secretly POST to Breezy's backend (via a local `/api/proxy` route that forwards to `app.socratic.systems` using a `BREEZY_PROFESSIONAL_TOKEN` and a `create_lead` endpoint); since that backend dies with Breezy, create a `FormPlaceholder` component (same theme, envelope icon, a "Contact Form Temporarily Unavailable — please call/text/email us directly" message with contact CTAs, plus a mention of Zinng.ai with a link to https://zinng.ai where they can get help setting up a working contact form, AND a clearly-marked developer TODO comment noting that a replacement embedded form widget from Zinng.ai (zinng.ai) can be dropped in later) and swap it in for every rendered form; then fully clean up: delete the form components, delete the `/api/proxy` route and its now-empty directory, remove any dead/unused form imports (e.g. a form component imported but never rendered), and confirm nothing in the app still references `/api/proxy`, `create_lead`, `socratic`, or the Breezy token. (5) CLEAN THE CSP + CONFIG — in `next.config.ts`, strip all `getbreezy.app` entries out of the Content-Security-Policy (script-src, connect-src, style-src, font-src, frame-src) and remove any dead CSS rules targeting Breezy iframes, but PRESERVE non-Breezy needs like Google Maps in `frame-src` and any analytics domains (e.g. PostHog). (6) RESPECT GENERATED / READ-ONLY FILES — Breezy exports include machine-generated files (e.g. a `professionalConstants.ts` marked "do not edit," and a click-to-source tooling file); avoid rewriting those where possible, and understand that leftover dead references inside protected tooling files are harmless — mention them but do not fight them. (7) FLAG (DON'T SILENTLY BREAK) TWO THINGS to the user at the end: first, Sentry is often still pointed at Breezy's org/project (`socratic-systems` / `breezy_sites`) in `next.config.ts`, so error monitoring will stop — offer to repoint or remove it; second, a leftover unused `BREEZY_PROFESSIONAL_TOKEN` may remain in a generated constants file that's marked "do not edit," which is harmless dead data — mention it and offer to strip it. (8) CRITICAL BUILD/VERIFY DISCIPLINE — never delete the `.next` directory; be aware that running `pnpm build` (production) WHILE the `next dev` server is running will overwrite the dev server's artifacts and cause bogus "React Client Manifest" errors and fully-unstyled pages (CSS served as ~9 bytes) — if you see that, the fix is to RESTART the dev server (which regenerates dev artifacts), NOT to re-edit code; after all changes, restart the dev server, load the site, confirm the CSS bundle is full-size (roughly 100KB, not 9 bytes), and use browser automation to visually verify the scheduling placeholder, form placeholder, and floating-chat placeholder all render correctly and that no Breezy iframe/script/text remains. Throughout, only edit files that need changing, remove code usages BEFORE removing their imports, preserve the site's existing design language, and keep the site professional and fully functional for real visitors at every step.
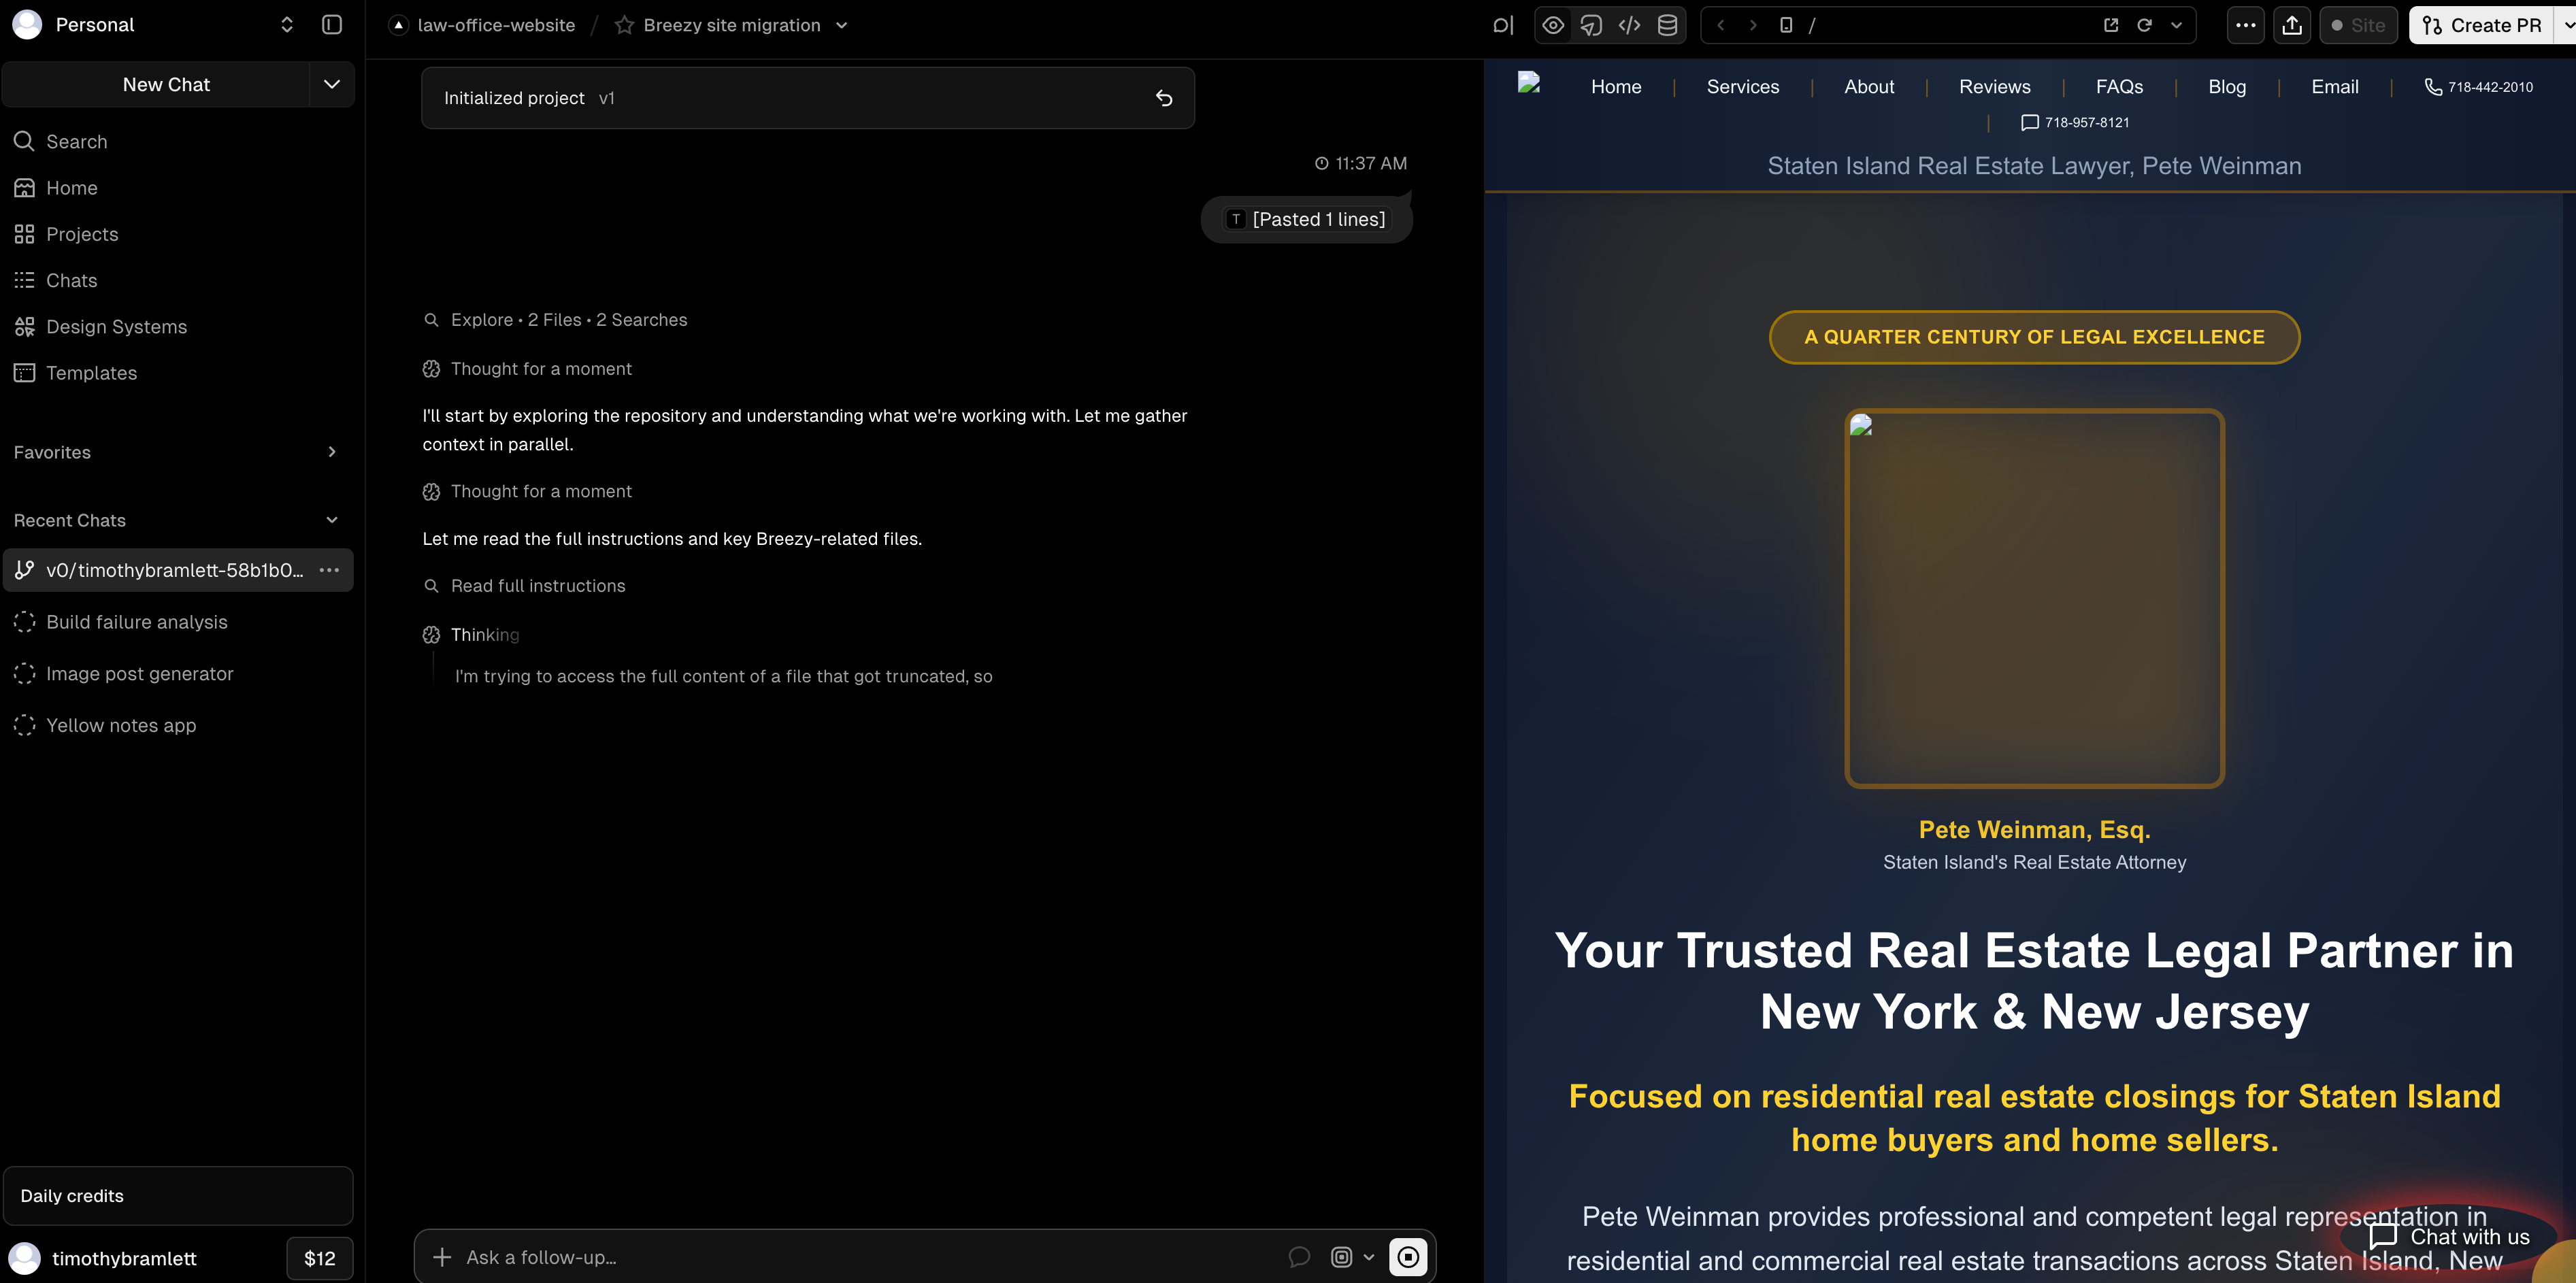
Paste the prompt (use the copy button above) into the "Ask a follow-up" box in v0 and send it.
One thing to watch for: the first time we pasted it, v0 could not seem to see the entire prompt and mentioned that part of it was truncated. If that happens to you, just paste the prompt in again. The second time, v0 picked up the full prompt, understood everything it needed to do, and got to work. From there it reads through your project, removes the Breezy pieces, self-hosts your images, and swaps in the placeholders, and you can watch a live preview of your site on the right as it goes.
v0 may also pause once in a while to ask you a question. If it asks about something the prompt already covers, you can simply tell it that the details are in the prompt and to go ahead, then let it keep working.
When v0 finishes, it lets you know the migration is complete. Your site is now free of Breezy and running cleanly on Vercel, with the scheduling, chat, and form placeholders in place.

A quick honest note on cost
Vercel v0 runs on credits, and a full migration like this can use a fair amount. Vercel's free plan gives you a limited amount of usage per day, so you may be able to spread the work over a few days, though keep in mind the free plan is intended for non-commercial use. For a business website we recommend the Pro plan (around twenty dollars a month). It is not the cheapest tool, but it works very well, and it is replacing the cost of hiring a web developer. Once the site is built, making future changes does not cost anywhere near what a developer would charge.
Step 5: Add your custom domain
Once the migration is done, you no longer need the AI. Vercel deploys your site for you (it may deploy automatically, or you may need to click deploy), and you can open the production URL any time to see the live version. Right now that live version is on a temporary Vercel web address (something ending in .vercel.app), so the last step is to point your own domain at it, so visitors see your site at your real address.
In v0, open the Site menu in the top right and click Visibility.
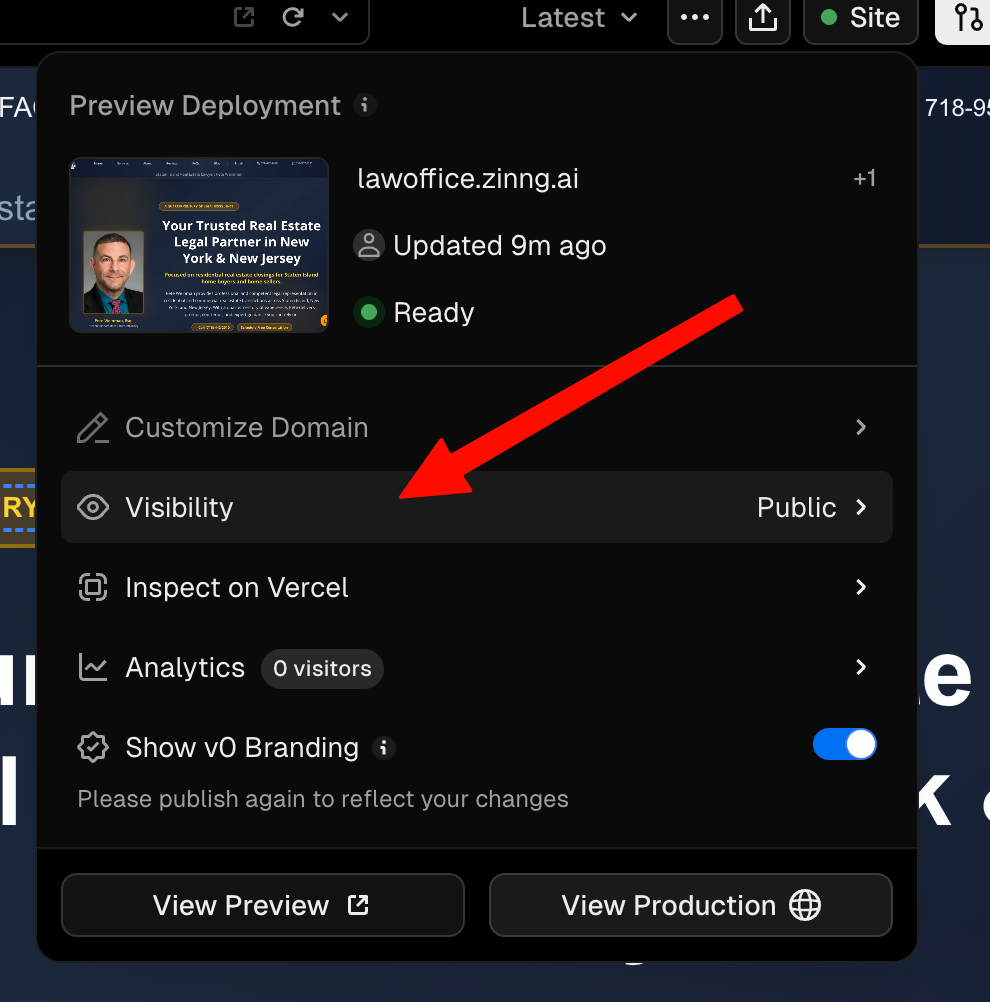
That opens a settings panel. In the left sidebar, click Domains, then click Add next to Connected Domains.
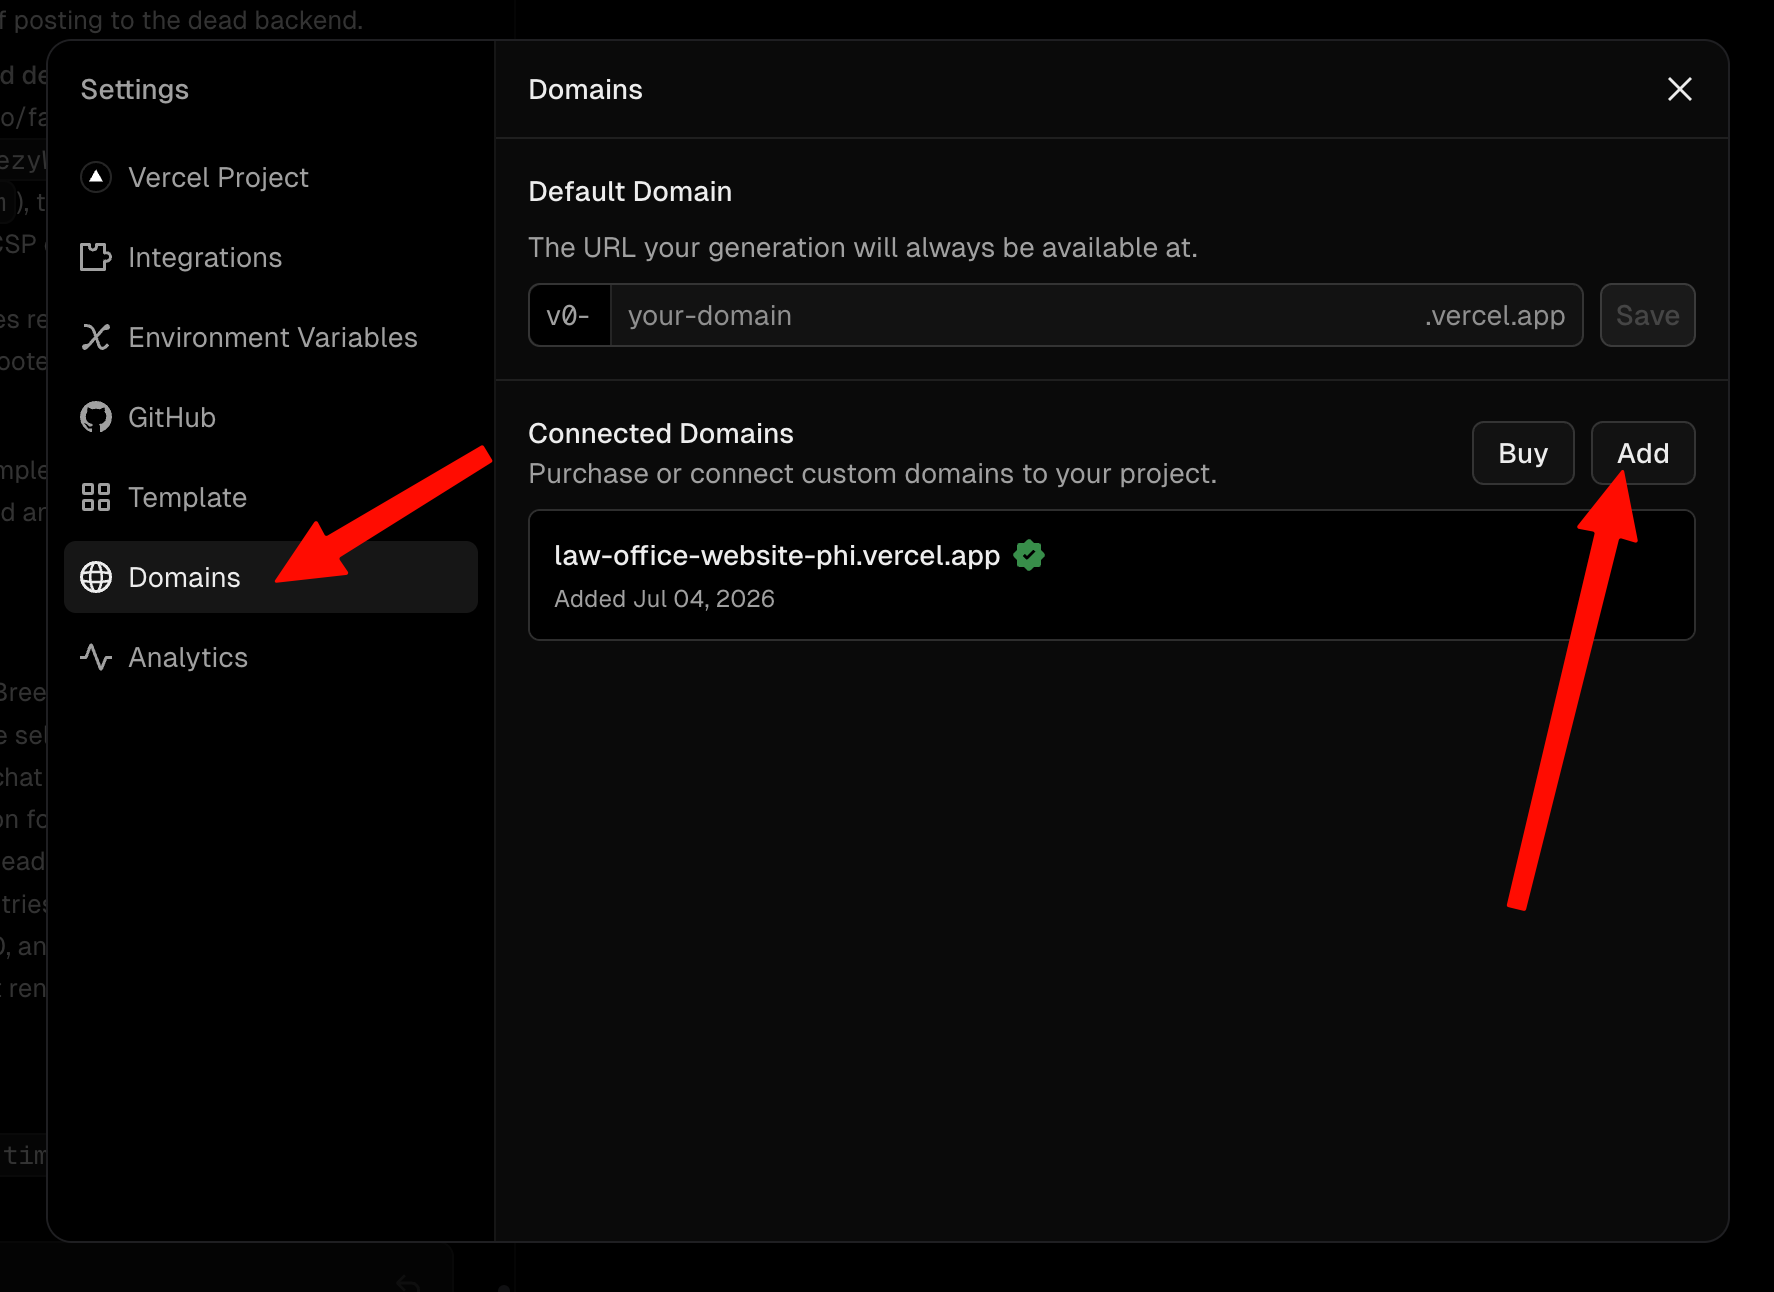
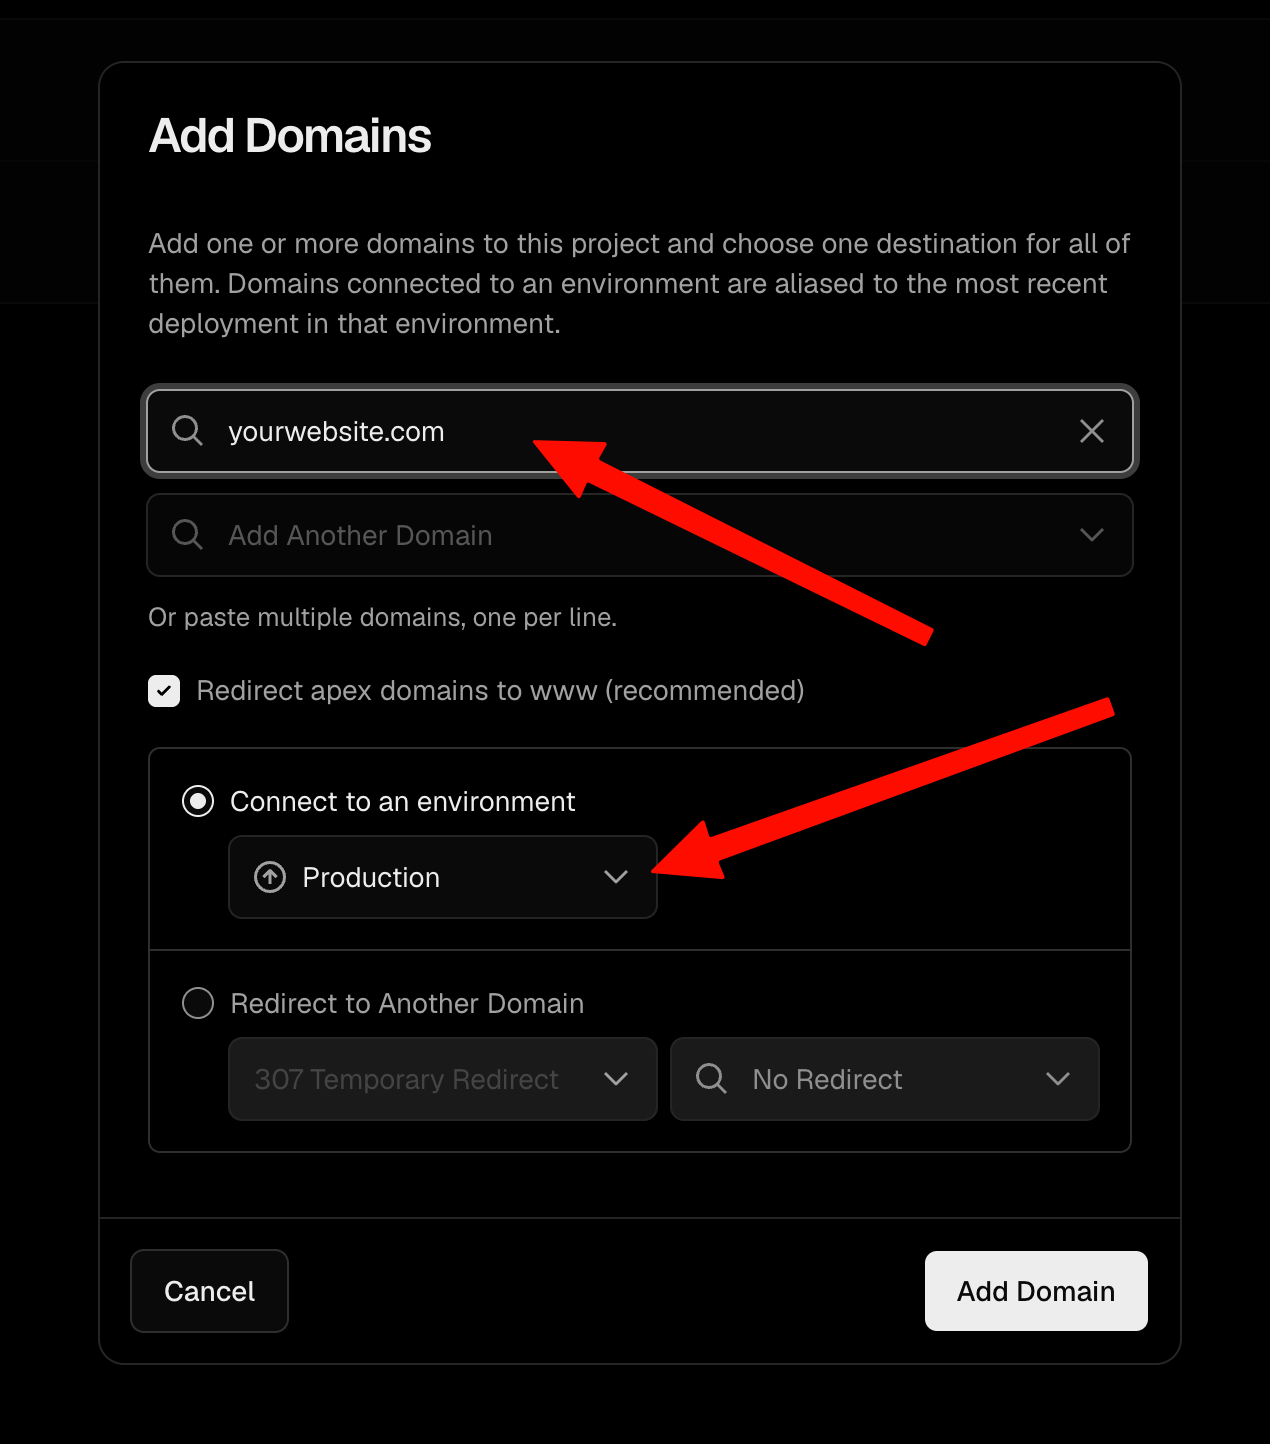
Enter your domain (for example yourbusiness.com, or a subdomain like the lawoffice.zinng.ai we used here). Leave Connect to an environment set to Production, then click Add Domain.
Vercel then shows the DNS record you need to add wherever your domain's DNS is managed. In our case it was a single CNAME record (a Name and a target Value). Add it exactly as shown at your DNS provider (Cloudflare, GoDaddy, Namecheap, and so on). Vercel will keep showing "Invalid Configuration" until the record is in place, that is normal.
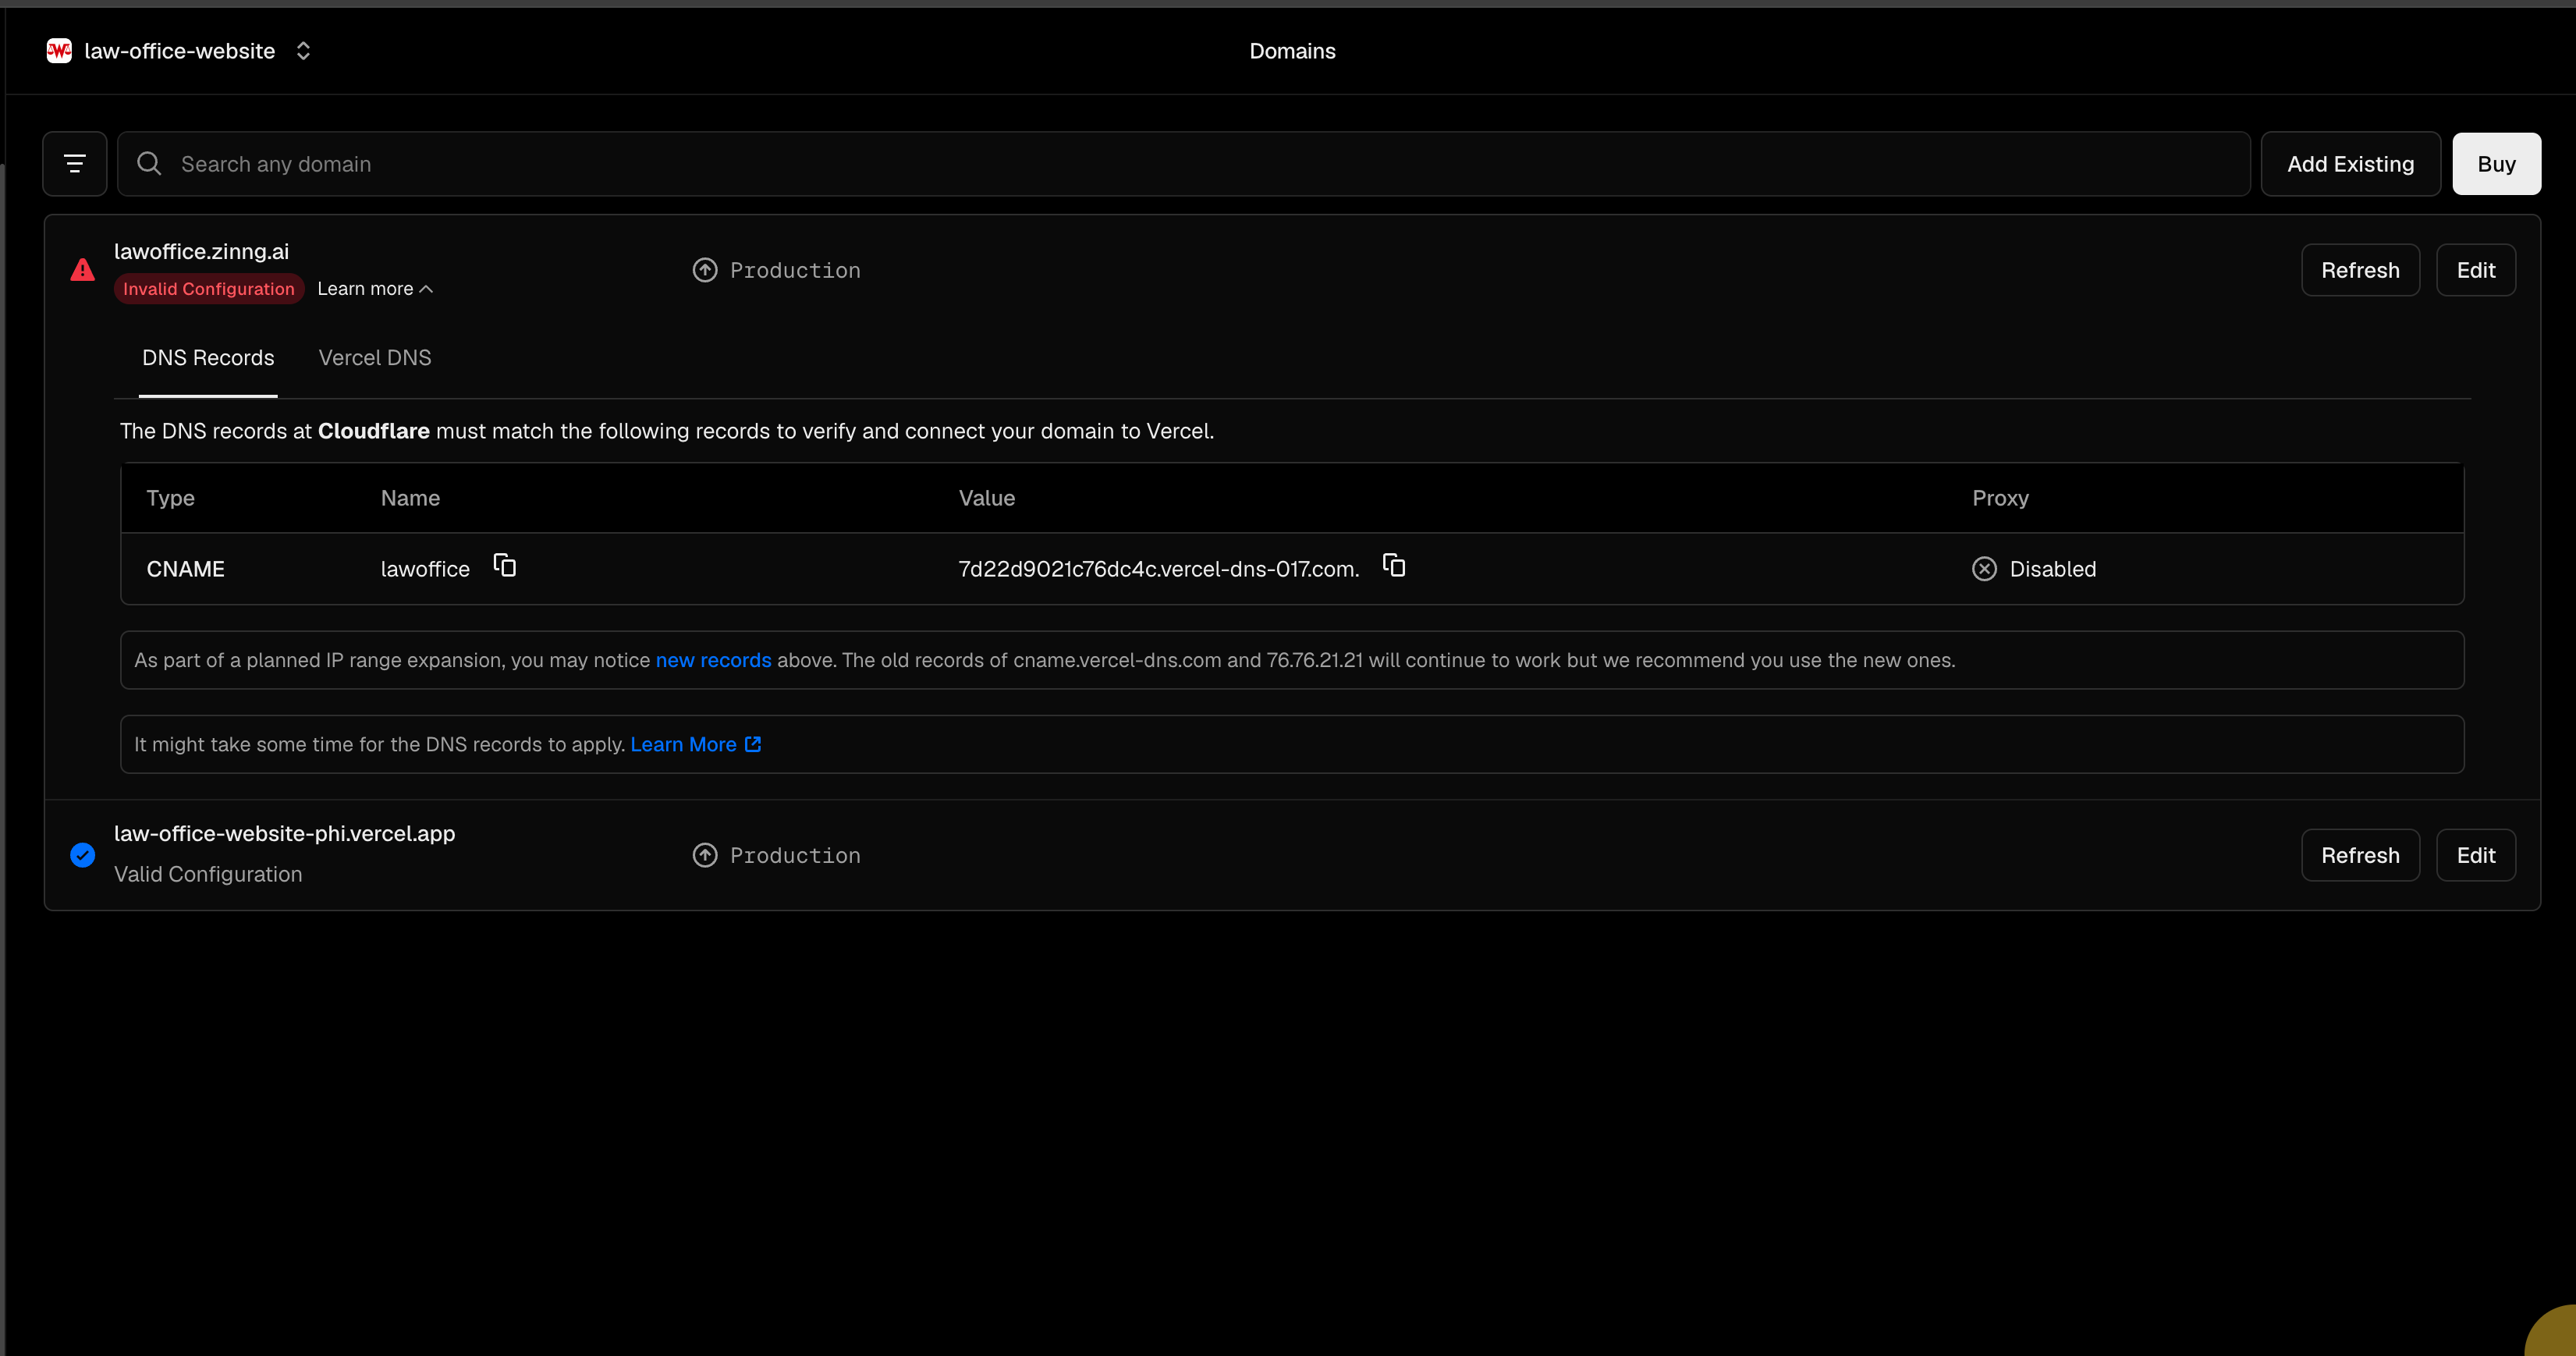
Once you save the record and it takes effect, refresh in Vercel. When it flips to "Valid Configuration," Vercel automatically deploys your site to that domain and you are live, with the secure padlock (HTTPS) set up for you. DNS changes can take anywhere from a few minutes to a few hours to apply.
Wrapping up
That is the whole migration. Your website is now off Breezy, running on Vercel, and pointed at your own domain, and you own every piece of it. No single company can pull the plug on it again.
One more thing worth doing: the scheduling, chat, and contact-form placeholders on your new site are meant to be replaced with something that actually works. Zinng has a website chat widget and a form widget you can embed so visitor messages and leads land straight in your inbox. If you would like a hand getting those set up, just reach out at [email protected]. And if you want an AI receptionist answering your phone, along with the chat widget, iOS and Android apps, and more coming soon, that is exactly what Zinng is built for.
Ready to get started?
Set up your AI phone agent in minutes. No credit card required.
Try Zinng Free for 7 Days
About the Author
Timothy Bramlett
Co-Founder & CEO, Zinng
Timothy Bramlett is an American entrepreneur, software engineer, and product strategist. He is the founder of Zinng, an AI-powered phone agent platform that helps businesses never miss a customer call with intelligent call handling, real-time transcripts, and instant summaries.