Agent Can't Hear You on Web Calls? Check Your Browser Microphone
The most common reason the Zinng AI agent doesn't respond during a Test Audio call or onboarding web call.
The Symptom
You started a web call with your Zinng agent, either from the Test Audio button on your agent's settings page, or from a web call during onboarding. You can hear the agent fine, but the agent doesn't respond to anything you say. It sounds like the agent has gone silent or is waiting for input that never arrives.
Sound familiar? Nine times out of ten this is your browser using the wrong microphone for the Zinng site, not a problem with the agent itself.
Where Web Calls Happen in Zinng
There are two places in Zinng where you can start a web call with your agent and run into this issue.
From the agent settings page
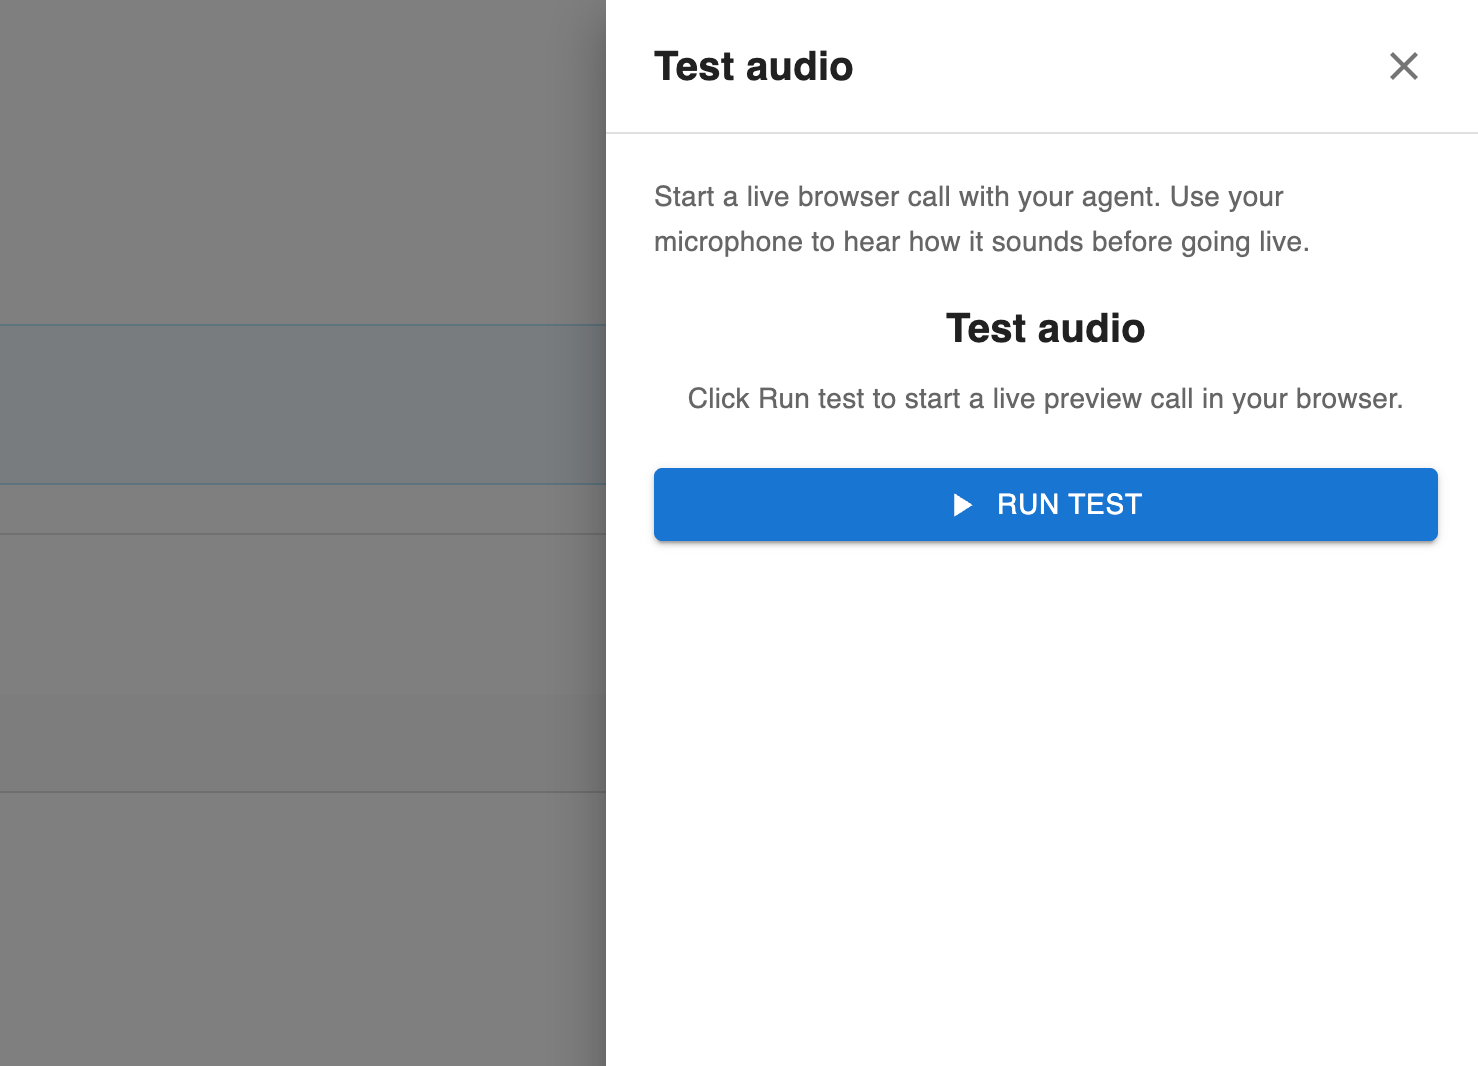
On any agent's edit page, the TEST AUDIO button in the top right opens a panel for starting a live browser call with that agent.
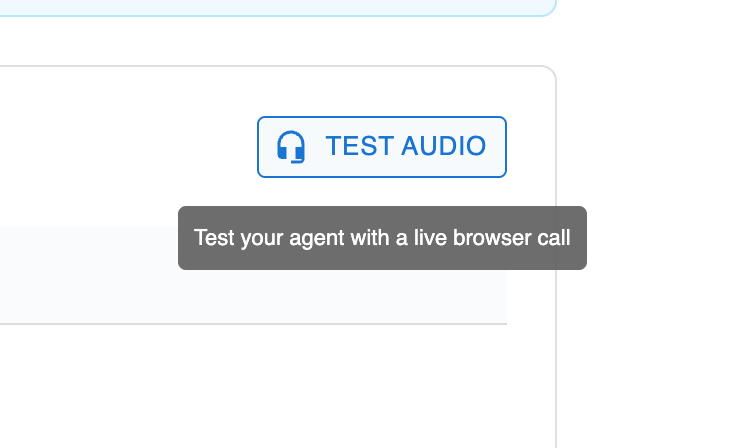
Clicking it opens the Test audio panel. Click RUN TEST to start the live call.
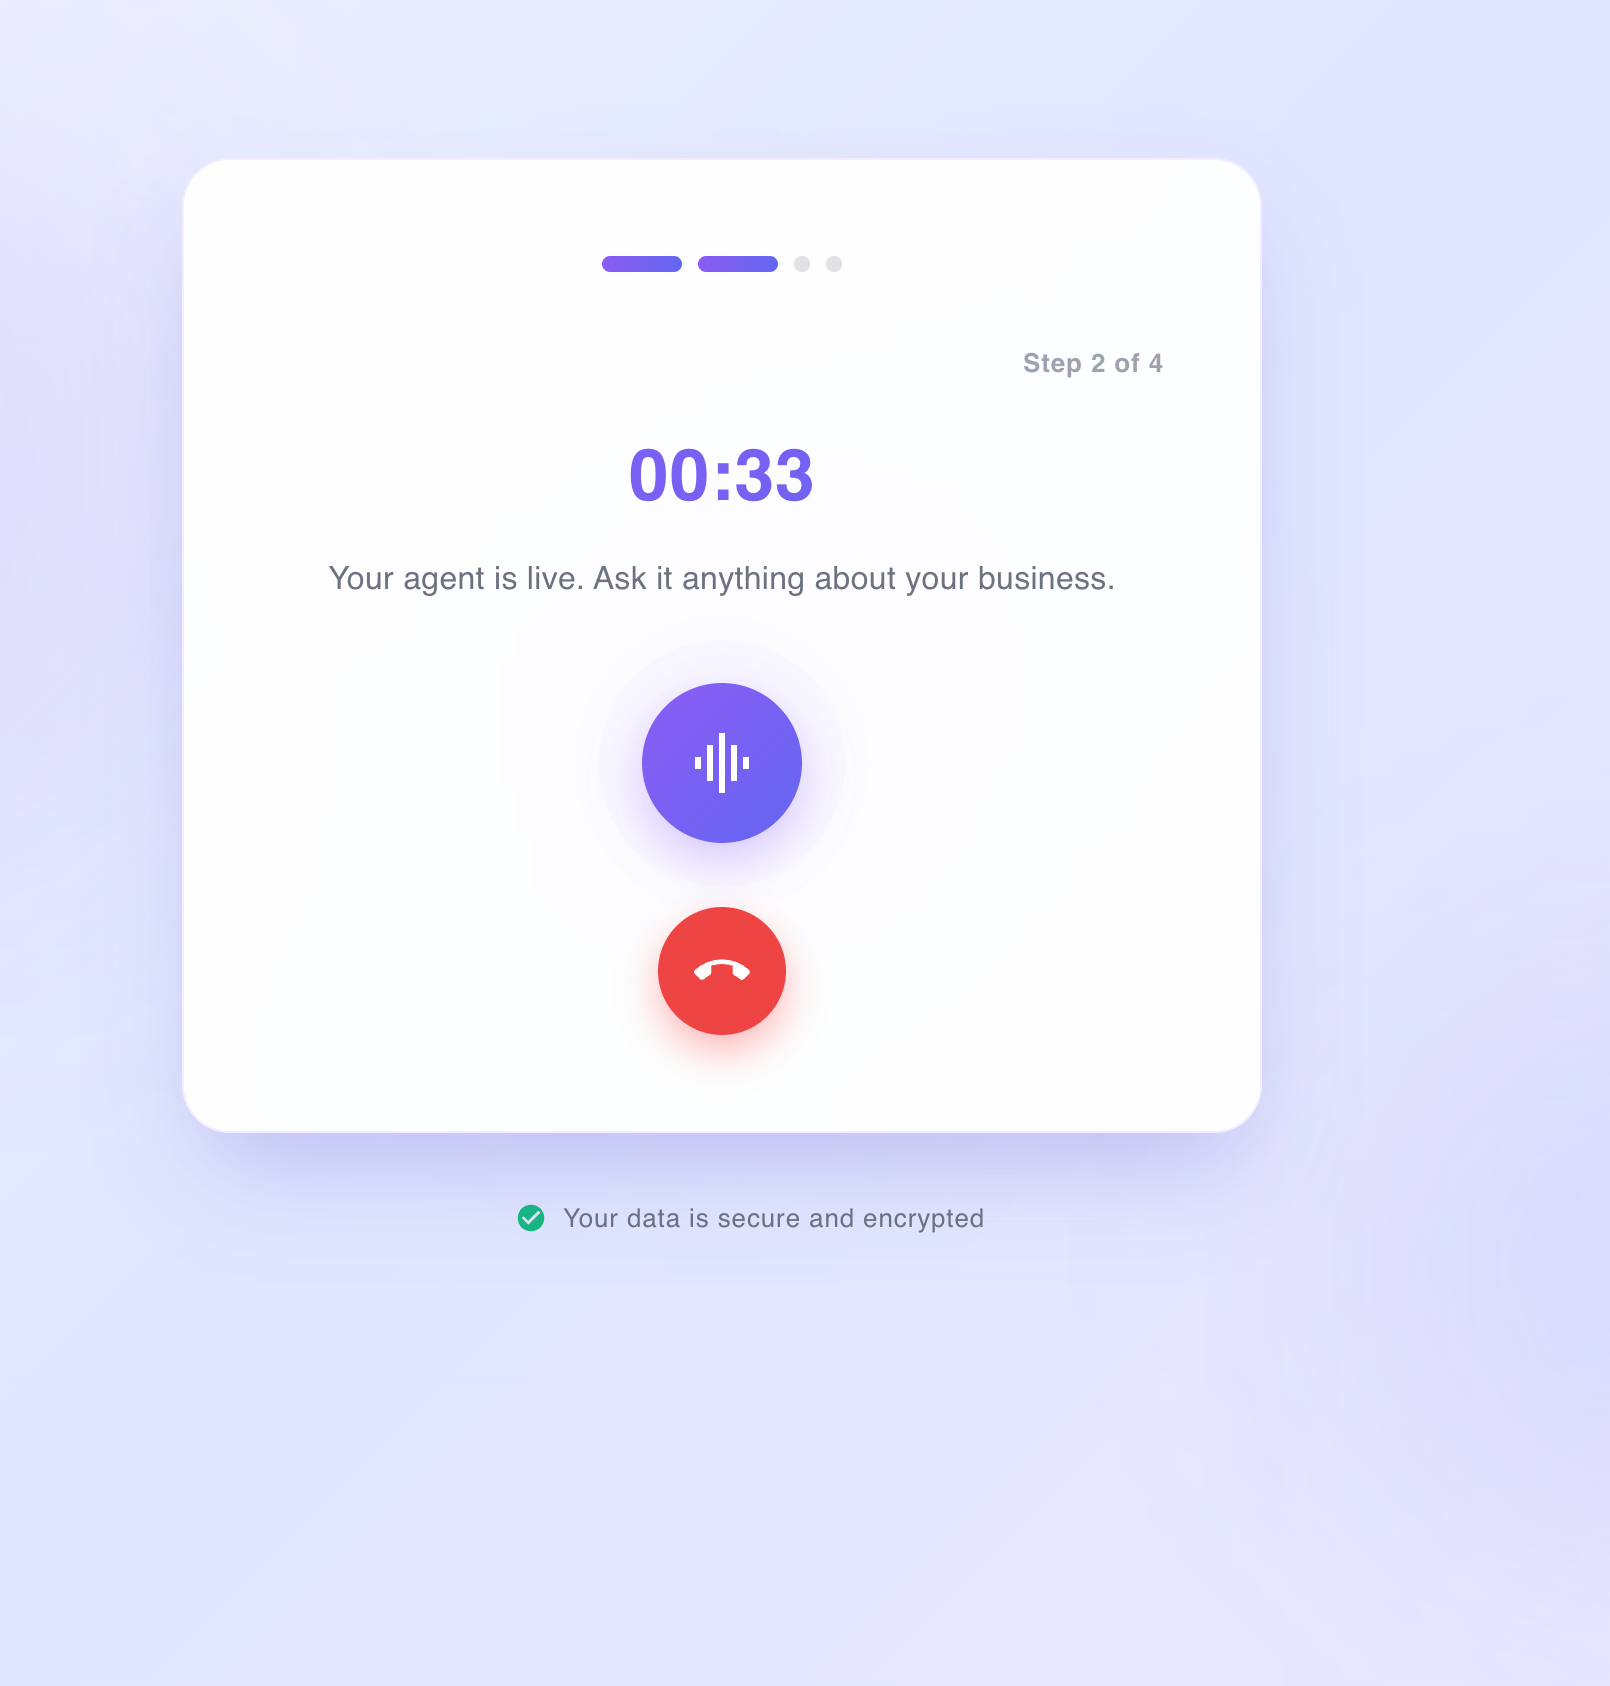
During onboarding
The onboarding flow includes a similar web call (Step 2 of 4) where you talk to your agent live so you can hear how it sounds before going live with real customers. The same browser microphone issue can surface there. If the agent says “Your agent is live. Ask it anything about your business” but doesn't respond when you speak, this is the mic problem.
In both cases, what happens behind the scenes is the same: your browser asks for microphone access (the first time), then routes audio from whichever microphone Chrome (or Safari, Edge, etc.) has selected for the Zinng site. If that selection is wrong, the agent literally never receives your voice.
Why This Happens
Browsers track microphone permissions per site. The first time you start a web call on app.zinng.ai, Chrome asks you to allow microphone access and remembers your choice. The catch: Chrome also remembers which microphone to use for that site, and the default is usually whatever was selected at the OS level when you first granted permission.
A few common scenarios that produce the wrong selection:
- You granted mic permission with AirPods connected, then later disconnected them. Chrome still tries to use the AirPods (now unavailable) and you sound silent to the agent.
- You granted mic permission with a USB mic plugged in, then unplugged it. Same issue.
- You have multiple input devices and the OS default doesn't match what you're actually talking into.
- You connected new audio gear (a podcast mic, a headset) after first granting permission. Chrome doesn't auto-switch to the new device.
Fix: Switch Chrome's Microphone for the Zinng Site
This is the fastest path to a fix. You'll switch the microphone Chrome uses for app.zinng.ai specifically, without changing anything on other sites.
Step 1: Open the site permissions popover
While you're on the Zinng dashboard (or any Zinng page), find the small icon to the left of the URL in the address bar. Depending on your Chrome version it'll be a lock, a tune slider, or an info circle. Click it. A popover drops down showing the site's permissions.
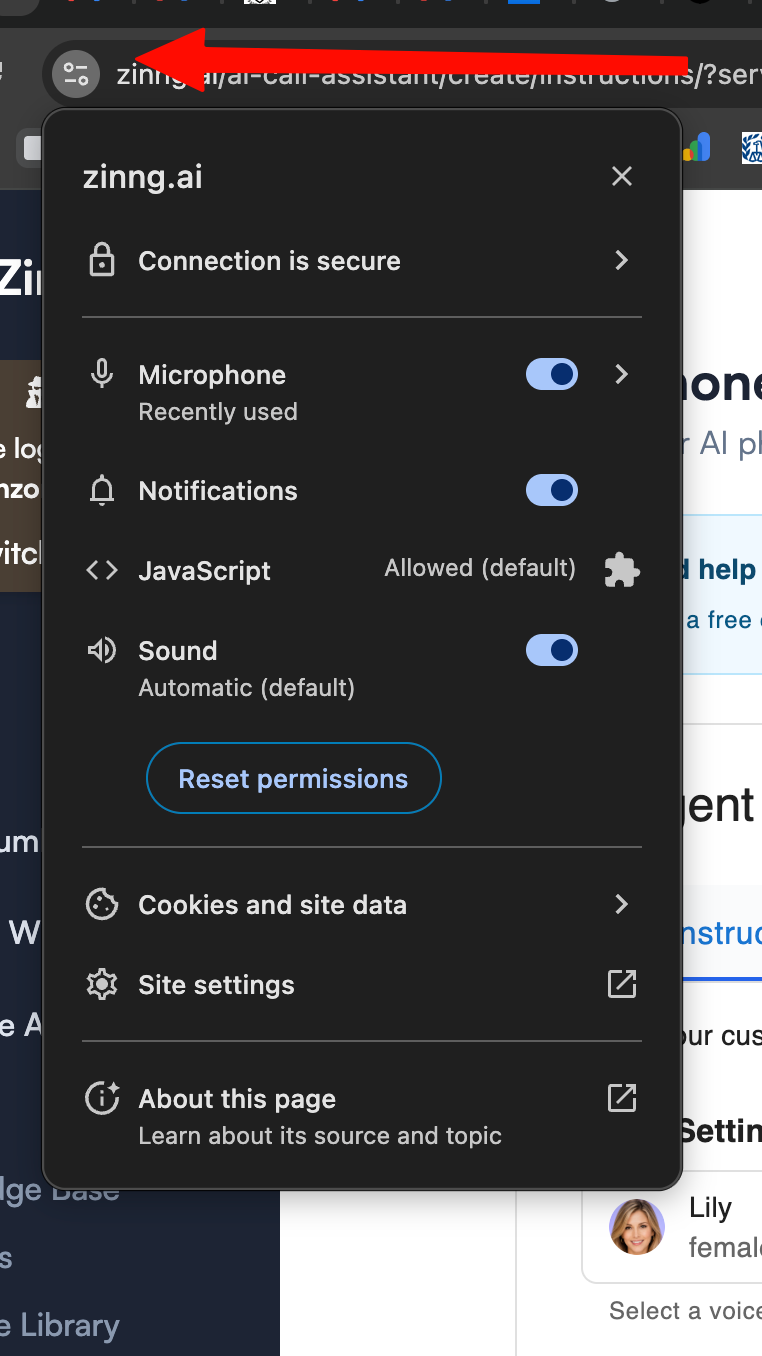
Step 2: Click Microphone and switch the device
In the popover, click the Microphone row. A sub-view opens showing the per-site microphone settings, including a dropdown of every input device Chrome can see on your system. Click the dropdown and pick the actual microphone you're talking into right now (for example, "AirPods Pro" or your USB mic) instead of whatever is currently selected.
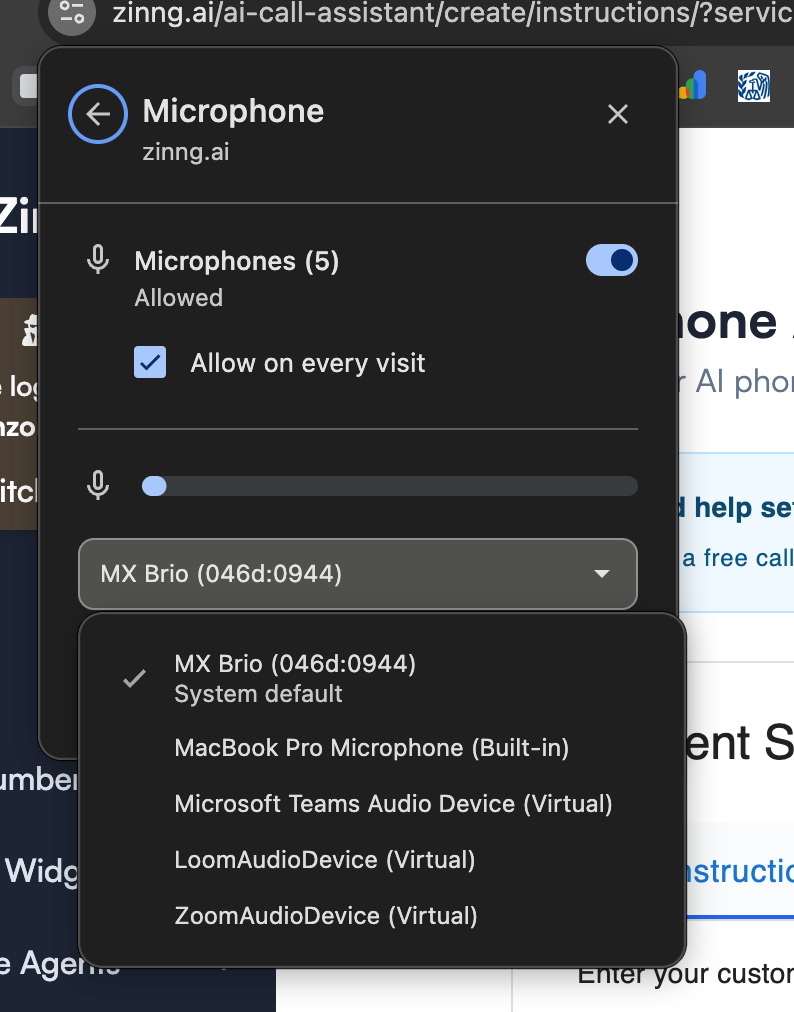
The audio level meter at the top of this sub-view is useful as a sanity check. Speak into the mic you just selected. If the level meter responds, Chrome is now receiving audio from the right device.
Step 3: Reload the Zinng page
Chrome doesn't apply the new microphone selection to a tab that's already open. Close the popover, refresh the page (Cmd+R on Mac, Ctrl+R on Windows), and then click TEST AUDIO again.
Step 4: Run another test call
Click TEST AUDIO → RUN TEST and speak. The agent should now respond to your voice within a second or two. If it does, you're done.
Alternative path: If you prefer the full Chrome settings UI, click Site settings at the bottom of the popover in Step 1 instead. That opens a dedicated settings page for app.zinng.ai with the same Microphone dropdown, plus every other permission for the site.
If You Want to Set This Globally in Chrome
The per-site fix above is targeted, but if you find yourself swapping microphones often, you can change Chrome's default input device:
- Open Chrome's settings: click the three-dot menu in the top right → Settings.
- Go to Privacy and security → Site settings → Microphone (or paste
chrome://settings/content/microphoneinto the address bar). - Use the dropdown at the top to pick the microphone Chrome should use by default for any site.
This affects the default. Sites you've already granted microphone permission to will still use whatever mic was set at the time of permission, so you may still need to do the per-site fix once for app.zinng.ai.
Other Desktop Browsers
Safari (macOS)
Safari handles microphone access differently from Chrome. Two things to check.
- Confirm Safari has permission for app.zinng.ai. Open Safari, then in the menu bar go to Safari → Settings → Websites → Microphone. Find app.zinng.ai in the list and make sure it's set to Allow. If it's set to Deny or Ask, change it to Allow.
- Pick the right input device at the macOS level. Safari does not let you choose a microphone per site the way Chrome does. It uses whatever microphone macOS is set to. Open System Settings → Sound → Input, select the correct device, and confirm the level meter responds when you speak.
After changing either of these, reload the Zinng tab and run another Test Audio call.
Microsoft Edge
Edge mirrors Chrome's behavior because it's built on the same engine. The exact same per-site fix applies. Click the lock icon next to the URL, click Microphone in the popover, and pick the right device from the dropdown.
Firefox
Firefox does not track input device selection per site. Whatever the OS-level default microphone is, that is what Firefox uses. Change the OS-level default (System Settings → Sound → Input on Mac, or Settings → System → Sound on Windows) and Firefox follows. You may also want to confirm Firefox has microphone permission for app.zinng.ai under Firefox → Settings → Privacy & Security → Permissions → Microphone → Settings.
Mobile Browsers
Web calls work in mobile browsers, but mobile microphone routing is a different beast. There is no per-site device dropdown the way desktop Chrome has one. Instead, your phone decides which mic to use based on what is connected (built-in, AirPods, Bluetooth headset, wired earbuds).
Safari on iPhone & iPad
- Confirm Safari has microphone permission for the site. Open the Test Audio call once. iOS will prompt you to Allow Microphone. Tap Allow. If you previously denied it, go to iOS Settings → Safari → Microphone and change it to Ask or Allow, then reload the page.
- Force the device you want to use. iOS prefers Bluetooth audio devices when they are connected. If AirPods are paired but in their case (or running low on battery, or out of range), iOS may still try to use them and fail. Either disconnect the Bluetooth device, put AirPods back in your ears, or use the iOS Control Center audio routing icon (long-press the audio module) to pick a different input.
- Reload the page after any change. iOS Safari caches the microphone selection per page load.
Chrome on Android
- Confirm site permission. Tap the three-dot menu in Chrome, then Settings → Site settings → Microphone. Make sure app.zinng.ai is set to Allow.
- Pick the input device at the Android level. Like Safari on iOS, Chrome on Android uses whatever the Android system is set to. Disconnect Bluetooth devices you do not want to use, or change the active audio route in the Android Quick Settings panel.
- Reload the page. Same caching behavior as desktop Chrome.
Chrome on iPhone & iPad
Chrome on iOS is required by Apple to use Safari's underlying engine (WebKit), so it behaves identically to Safari for microphone access. Follow the Safari on iPhone & iPad instructions above. Installing a different browser on iOS does not give you a different mic routing path.
If mobile is giving you trouble, try desktop first
The Test Audio call is significantly easier to diagnose on a desktop browser because of the per-site mic dropdown in Chrome. If you have access to a laptop, finish setup there. Once your agent is configured and live, real customer calls hit your phone number directly and do not depend on browser microphone routing.
Still Not Working? Check Your OS Microphone
If you've checked the browser's microphone selection and the agent still can't hear you, the input may be muted or wrong at the operating-system level.
macOS
- Open System Settings → Sound → Input.
- Confirm the right device is selected and the input volume isn't at zero.
- Speak. The level meter should respond. If it doesn't, the OS isn't receiving input from that device at all (separate issue from Chrome).
Windows
- Open Settings → System → Sound → Input.
- Pick the right device under “Choose a device for speaking or recording.”
- Click Test your microphone and confirm the meter responds.
If the OS-level input is working but Chrome still can't capture audio, try a fully fresh test: close Chrome entirely, reopen it, and try the test audio call again. Occasionally Chrome holds onto a stale microphone reference until restart.
Still stuck?
If you've gone through the browser and OS-level fixes and the agent still can't hear you, this isn't typical and we'd like to take a look. Reach out via the chat widget in the bottom-right of any Zinng page, call (213) 263-4777, or email [email protected].